Fudgy Chocolate Cake Bars: The Ultimate Recipe for Decadent Bliss
Discover the secret to making rich, tender, and perfectly fudgy chocolate cake bars with this foolproof recipe. Learn the simple techniques that ensure an incredible fudgy texture and intense chocolate flavor every single time. This is a one-pan wonder you'll want to make again and again.
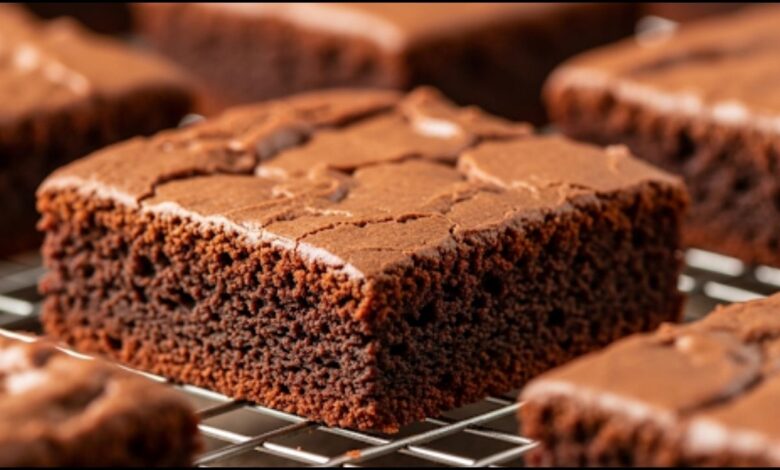
There are times in life when only chocolate will do. You know the feeling that deep, undeniable craving for something rich, moist, and utterly satisfying. Maybe it’s after a long day, a particularly challenging week, or just a Tuesday afternoon that could use a little extra sweetness. For me, that craving always leads me to one place: a batch of my Fudgy Chocolate Cake Bars. They are the answer to every chocolate desire, a one-pan wonder that delivers pure, unadulterated comfort. This isn’t your average, dry cake or a dense, overly sweet brownie. These bars live in a magical space right in the middle. They have the deep cocoa flavor of a classic brownie, the tender crumb of a moist cake, and a perfectly fudgy texture that melts in your mouth. This recipe has been a family favorite for years, and I’m so excited to share my secrets with you. With a few simple ingredients and my easy-to-follow steps, you’ll be baking a batch of these glorious Fudgy Chocolate Cake Bars in no time.
Quick Recipe
- Preparation Time: 15M
- Cooking Time: 35M
- Total Time: 50M
- Type of dish: Dessert
- Cuisine: American
- Recipe Yield: 16 bars
- Calories: 250 calories per bar
Why These Fudgy Chocolate Cake Bars Are Your New Favorite
- Perfectly Fudgy Texture: We’ll use a special technique to make sure these bars are never dry, but always moist and incredibly fudgy.
- One-Pan Wonder: This is a truly simple recipe that comes together in a single saucepan, making cleanup a breeze.
- Simple Ingredients: You likely have everything you need in your pantry right now. No fancy chocolates or special flours are required.
- Incredibly Versatile: Enjoy them plain, or dress them up with a simple ganache, a dusting of powdered sugar, or a scoop of ice cream.
The Magic Behind the Fudgy Texture
The secret to a truly fudgy chocolate cake bars recipe lies in how you handle the ingredients. Unlike many cake recipes that use creaming methods, this one starts on the stovetop. We’ll be melting the butter and cocoa together, a technique known as the “melted method.” This simple step is what gives the bars their signature dense, almost brownie-like chewiness while still retaining the tenderness of a cake.
This is a step I learned from years of baking. When you mix dry cocoa powder with melted butter and hot water, you’re essentially “blooming” the cocoa. This process helps to dissolve the cocoa solids and release its full, rich chocolate flavor. Think of it like making a really strong cup of hot chocolate before you add the rest of the ingredients. It’s a small detail, but it makes a huge difference in the final flavor.
A Note on Ingredients
You don’t need fancy, expensive ingredients to make a fantastic dessert. A good quality unsweetened cocoa powder from the baking aisle is all you need. I prefer Dutch-process cocoa powder for its dark color and smoother flavor, but a natural unsweetened cocoa will also work beautifully. Don’t be tempted to use cake flour, as its lower protein content can make the bars too delicate and crumbly. We want something that holds up well for a nice, fudgy chew. When measuring your flour, a simple tip is to lightly spoon it into your measuring cup and then level it off with the back of a knife. This prevents you from packing too much flour in, which can lead to a dry cake.
The Recipe: Fudgy Chocolate Cake Bars
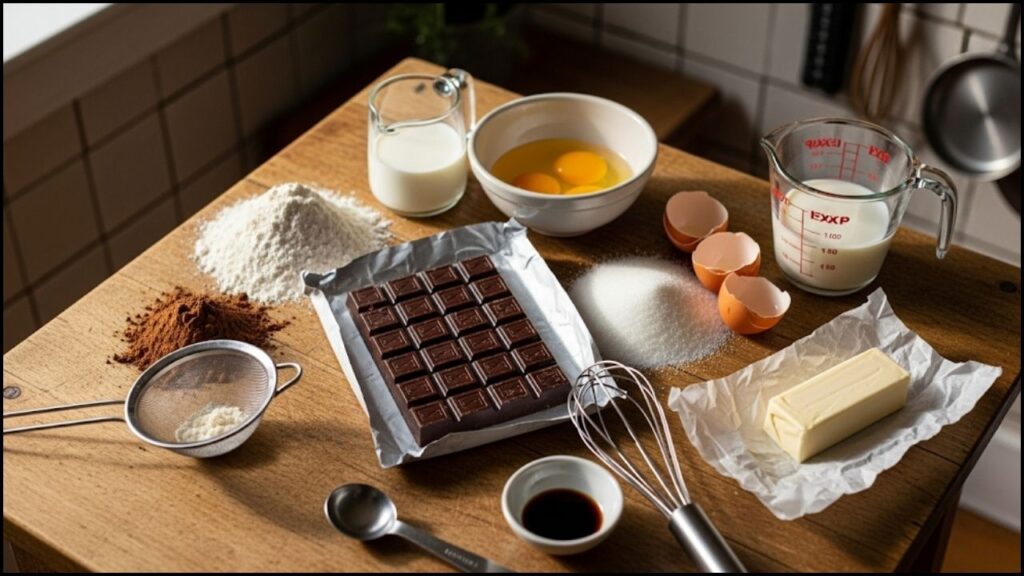
Ingredients
- 1 cup (2 sticks or 226g) unsalted butter
- 1 cup granulated sugar
- 1/2 cup packed light or dark brown sugar
- 3/4 cup unsweetened cocoa powder (Dutch-process or natural)
- 1/2 cup hot water
- 2 large eggs, at room temperature
- 1 tsp vanilla extract
- 1 1/4 cups all-purpose flour
- 1/2 tsp baking soda
- 1/2 tsp salt
- Optional mix-ins: 1 cup chocolate chips, nuts, or espresso powder
Tools You’ll Need
- 8×8-inch baking pan
- Medium-sized saucepan
- Whisk
- Rubber spatula
- Measuring cups and spoons
- Parchment paper
Instructions for Recipe
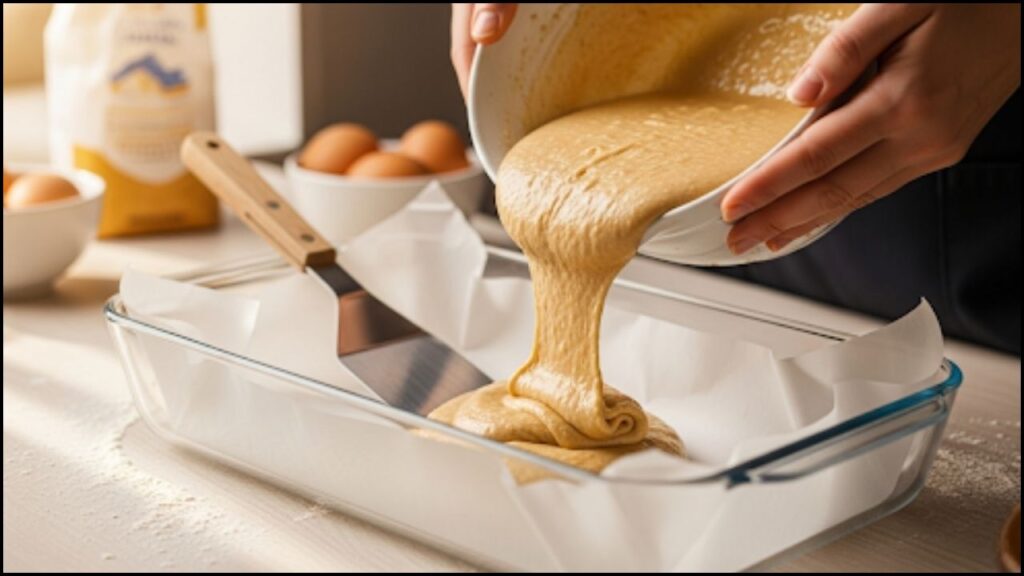
1. Prepare Your Pan and Oven: Preheat your oven to 350°F (175°C). Line an 8×8-inch baking pan with parchment paper, leaving a slight overhang on two sides. This creates a “sling” that will make it incredibly easy to lift the finished bars out of the pan.
2. Melt the Butter and Sugar: In a medium saucepan over low to medium heat, melt the butter. Once it’s fully melted, turn off the heat and stir in both the granulated and brown sugars. The sugars won’t dissolve completely, and that’s okay. Just make sure they’re well-incorporated with the butter.
3. Bloom the Cocoa: Add the cocoa powder to the saucepan and whisk until it forms a smooth, thick paste. This is where the magic happens! Stir in the hot water. The mixture will look a little thin and glossy, almost like a hot fudge sauce. Set this aside to cool for about 5 minutes. This step is important because we don’t want to cook our eggs when we add them.
4. Add Wet Ingredients: Once the chocolate mixture has cooled slightly, whisk in the eggs, one at a time, until fully combined. Then, stir in the vanilla extract. The mixture will become beautifully smooth and glossy.
5. Combine Dry Ingredients: In a separate bowl, whisk together the flour, baking soda, and salt. This ensures all the dry ingredients are evenly distributed before you add them to the wet mixture.


6. Combine Everything: Pour the dry ingredients into the chocolate mixture in the saucepan. Using a rubber spatula, fold the flour mixture in gently until just combined. Be careful not to overmix! Overmixing will develop the gluten in the flour, resulting in a tough, chewy bar instead of a tender one. I learned this the hard way after a few tough batches. A few streaks of flour are better than overmixing. If you’re using mix-ins like chocolate chips, gently fold them in now.
7. Bake: Pour the batter into your prepared baking pan and spread it into an even layer with the spatula. Bake for 30-35 minutes. You’ll know it’s done when a toothpick inserted into the center comes out with a few moist crumbs attached—but not with wet batter. The top will also look set and slightly crackled.
8. Cool and Cut: Let the bars cool completely in the pan on a wire rack. This is arguably the hardest part of the process, but it’s crucial! Cooling allows the bars to set and firm up, ensuring a clean cut. Once cool, use the parchment paper sling to lift the entire cake out of the pan and cut it into 16 squares.
Tips for Success
- Don’t Overbake: This is the number one mistake people make. The key to that perfectly fudgy center is to pull them out of the oven a little early. Remember, they continue to cook a little bit from the residual heat even after they come out of the oven.
- Room Temperature Eggs: Using room temperature eggs helps them mix more easily and smoothly into the batter, leading to a better final texture.
- Storage: Store the bars in an airtight container at room temperature for up to 3 days, or in the refrigerator for up to a week. They are also fantastic warm with a scoop of vanilla ice cream.
A Final Serve
I hope this recipe for Fudgy Chocolate Cake Bars becomes a staple in your kitchen, just as it has in mine. It’s more than just a dessert; it’s a simple, reliable way to create a moment of joy and comfort for yourself and those you love. There’s no greater feeling than sharing a plate of something you’ve made with your own two hands, especially when it’s this delicious. So go ahead, preheat that oven, and get ready to be a chocolate hero.


