The Best Fluffy Peanut Butter Cookies: A Step-by-Step Guide
Tired of flat, crispy peanut butter cookies? This is the ultimate guide to making incredibly fluffy peanut butter cookies. With a secret ingredient and a few simple techniques, you'll get perfectly soft, chewy, and thick cookies every time.
Do you have a core memory of a perfect cookie? For me, it was a peanut butter cookie from a little bakery I visited as a kid. It wasn’t like the others I’d had—it wasn’t thin, crispy, or sandy. It was thick, pillowy-soft, and packed with the most incredible peanut butter flavor. For years, I tried to recreate that cookie, but my attempts often came out flat and disappointing.
After countless batches and a few “happy accidents” in my kitchen, I finally cracked the code. This recipe is the result of that journey. These are the fluffy peanut butter cookies I’ve been chasing for years. They are delightfully soft, wonderfully chewy in the center, and they stay that way for days. I’m sharing all my secrets with you today so you can skip the trial and error and go straight to baking the best peanut butter cookies of your life. Let’s get baking!
Quick Recipe
- Preparation Time:
1H20M - Cooking Time:
12M - Total Time:
1H32M - Type of dish: Dessert
- Cuisine: American
- Recipe Yield: 24 cookies
- Calories: 185 kcal per cookie
What Makes These Peanut Butter Cookies So Fluffy?
The difference between a flat, crispy cookie and a soft, puffy one comes down to a few key details. I’ve tested every variable so you don’t have to! Here’s what makes this recipe special.
- First, we pay close attention to our ingredients. The type of peanut butter you use matters more than you’d think. We also add a secret ingredient, cornstarch, which makes the cookies incredibly tender and helps them hold their shape.
- Second, we focus on technique. The way you mix your ingredients is crucial. Properly creaming your butter and sugar creates tiny air pockets that act as a leavening agent, giving the cookies lift.
- Finally, and this is the step you absolutely cannot skip, we chill the dough. This is probably the most important factor in achieving those thick, fluffy peanut butter cookies. Chilling solidifies the fat (the butter), which means the cookies spread much more slowly in the oven. That slow spread allows them to puff up beautifully before they set.
The Ingredients You’ll Need
Think of this as your shopping list. I’ve found that using the right ingredients is half the battle. Here’s what you’ll need and why:
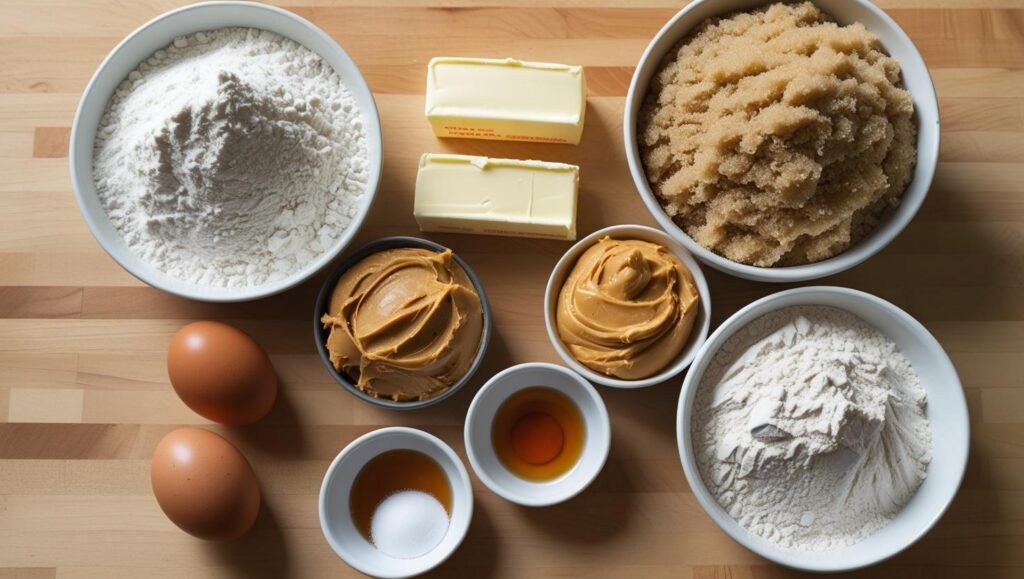
- All-Purpose Flour: The sturdy foundation of our cookies.
- Cornstarch: Our secret weapon! It softens the proteins in the flour, resulting in a more tender, soft peanut butter cookie.
- Baking Soda: This is our primary leavener. It reacts with the acidic brown sugar to help the cookies rise.
- Salt: A must-have in any sweet recipe. It balances the sugar and enhances the peanut butter flavor.
- Unsalted Butter: Make sure it’s at room temperature. This is crucial for the creaming process. “Room temperature” means it’s soft enough to press an indent into easily, but not melty or greasy.
- Creamy Peanut Butter: For the best results, use a standard commercial brand like Jif or Skippy. These have stabilizers that prevent the oil from separating, which gives you a more consistent dough and a better final texture.
- Granulated Sugar & Brown Sugar: Using both gives us the best of both worlds. Granulated sugar helps the cookies spread just enough, while the molasses in the brown sugar adds moisture, chewiness, and flavor.
- Large Egg: This binds everything together. Like the butter, it should be at room temperature to incorporate more easily into the dough.
- Vanilla Extract: A splash of pure vanilla extract rounds out all the flavors.
A Note on Peanut Butter
A lot of people ask if they can use natural peanut butter. While I love it for sandwiches, it can be tricky in this recipe. The natural oil separation can make the dough oily or crumbly, leading to cookies that spread too much. For a guaranteed fluffy outcome, I highly recommend sticking to a conventional brand.
How to Make Fluffy Peanut Butter Cookies: Step-by-Step
This is an easy peanut butter cookie recipe, but following the steps in order is key. I’ll walk you through it.
Step 1: Whisk the Dry Ingredients
In a medium bowl, whisk together the flour, cornstarch, baking soda, and salt. Whisking is better than stirring with a spoon because it distributes everything evenly and aerates the mixture. Set this bowl aside for later.
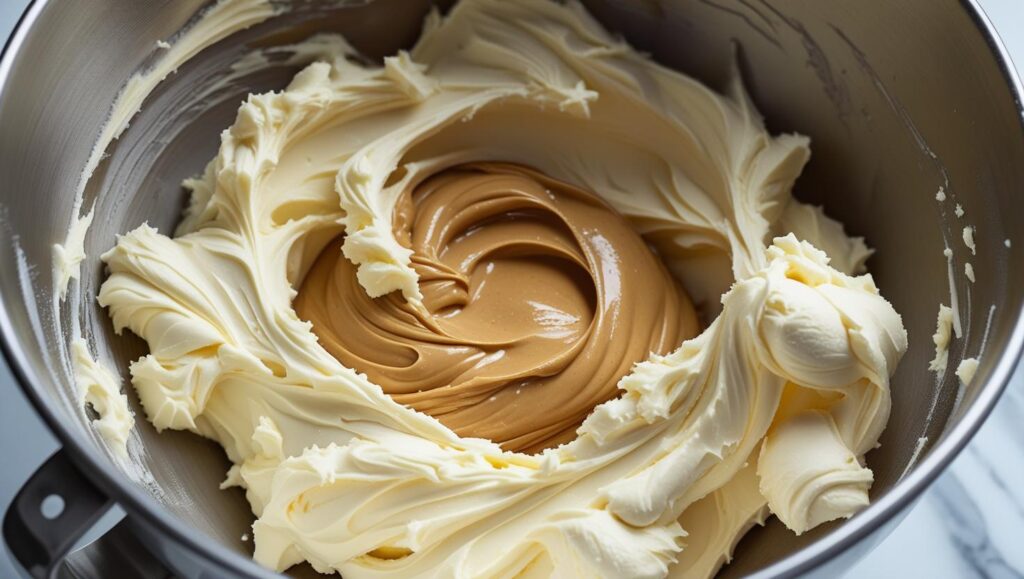
Step 2: Cream the Butter, Peanut Butter, and Sugars
- This is the most important step for a fluffy texture. In a large bowl using a stand mixer or a hand mixer, beat the room-temperature butter and peanut butter together until they’re smooth and combined.
- Now, add the granulated and brown sugars. Start mixing on low speed and gradually increase to medium-high. Beat for a full 2-3 minutes, scraping down the sides of the bowl occasionally. The mixture should become noticeably lighter in color and look fluffy, almost like frosting. Those are the air pockets we want!
Step 3: Add the Egg and Vanilla
Add the room-temperature egg and vanilla extract to the creamed mixture. Mix on medium speed until just combined. Don’t overmix here; you just want everything to come together.
Step 4: Combine the Wet and Dry Ingredients
With the mixer on its lowest speed, gradually add the dry ingredient mixture to the wet ingredients. Mix until the flour is almost gone. It’s okay to see a few streaks of flour. Overmixing develops gluten, which can make the cookies tough instead of soft and tender. I often finish mixing the last little bit by hand with a spatula.


Step 5: Chill the Dough (Don’t Skip This!)
Cover the bowl with plastic wrap and chill the dough in the refrigerator for at least 60 minutes. You can even chill it for up to 3 days. This step is non-negotiable for thick, fluffy peanut butter cookies. It prevents them from spreading into sad, flat discs in the oven.
Step 6: Shape and Bake
- When you’re ready to bake, preheat your oven to 350°F (175°C) and line two baking sheets with parchment paper.
- Scoop the chilled dough into balls, about 1.5 tablespoons each. Roll them between your palms to make them smooth. Place them a few inches apart on the prepared baking sheets.
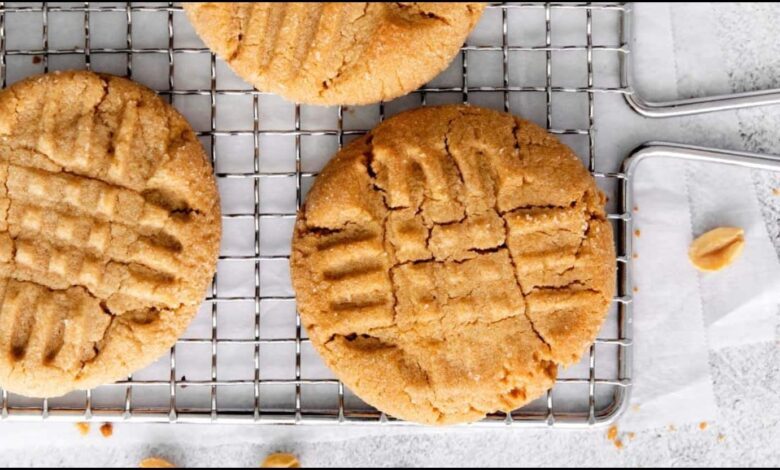
- Now for the fun part! Use the tines of a fork to gently press a criss-cross pattern onto the top of each cookie. This isn’t just for looks; it helps to flatten the cookie slightly for more even baking.
- Bake for 10-12 minutes. The edges should be set and lightly golden, but the centers will look a little soft and underdone. That’s the secret to a chewy peanut butter cookie center! Pull them out of the oven. They will continue to set on the hot baking sheet.
- Let the cookies cool on the baking sheet for 5 minutes before transferring them to a wire rack to cool completely.
| Essential Tools |
| Stand Mixer or Hand Mixer |
| Mixing Bowls |
| Whisk & Spatula |
| Baking Sheets |
| Parchment Paper |
| Cookie Scoop (optional, but great for uniform cookies) |
A Cookie Worth Keeping
There is something so comforting about a truly great peanut butter cookie. This recipe has become a staple in my home, perfect for everything from after-school snacks to holiday cookie swaps. It’s reliable, it’s delicious, and it delivers that perfect fluffy, soft texture every single time.
I hope you love these fluffy peanut butter cookies as much as my family and I do. Happy baking!
Read More
How to Make the Best Chocolate Scotcheroos (They’re Easier Than You Think!)


