The Fluffiest Whole Wheat Pancakes Recipe You’ll Ever Make
Learn how to make the fluffiest, most delicious whole wheat pancakes with this foolproof recipe. We'll show you the simple tricks to achieve a light, airy texture and a rich, nutty flavor that will make this a new family favorite.
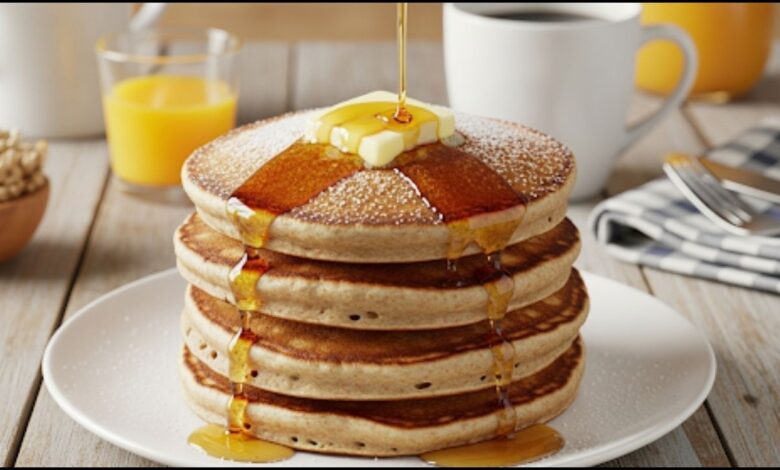
There’s a special kind of comfort that comes with a Saturday morning. The world feels a little slower, the air is full of possibility, and the kitchen smells like something truly wonderful is about to happen. For me, that something has always been pancakes. But for years, I struggled to find a whole wheat pancakes recipe that wasn’t dense, dry or frankly, a little sad. I wanted that golden-brown crust, that light and airy interior, and a flavor that tasted wholesome, not like a chore. After countless mornings of tinkering in my own kitchen, I finally landed on this recipe, and it’s become a family favorite. It delivers on all the things I was missing a light texture, a slightly nutty flavor from the whole wheat, and a beautiful fluffiness that makes you forget these are a healthy choice. This isn’t just a recipe; it’s a guide to making a perfect, feel-good breakfast. And I promise, you can make them too.
Quick Recipe
- Preparation Time: 10M
- Cooking Time: 15M
- Total Time: 25M
- Type of dish: Breakfast
- Cuisine: American
- Recipe Yield: 4 servings (about 8-10 pancakes)
- Calories: 250 calories per serving (without toppings)
Why This Recipe Just Works
- No Resting Required: Many whole wheat recipes ask you to let the batter rest. We’ve figured out how to skip that step without sacrificing texture.
- The Secret to Fluffiness: We’ll use a simple trick that guarantees a light and airy pancake every time.
- A Balance of Flavor: These aren’t just wholesome; they’re delicious. The recipe balances the nutty whole wheat with a hint of sweetness.
The Ingredients
You’ll notice we’re not using any hard-to-find ingredients here. The magic is in the method, not the obscure products.
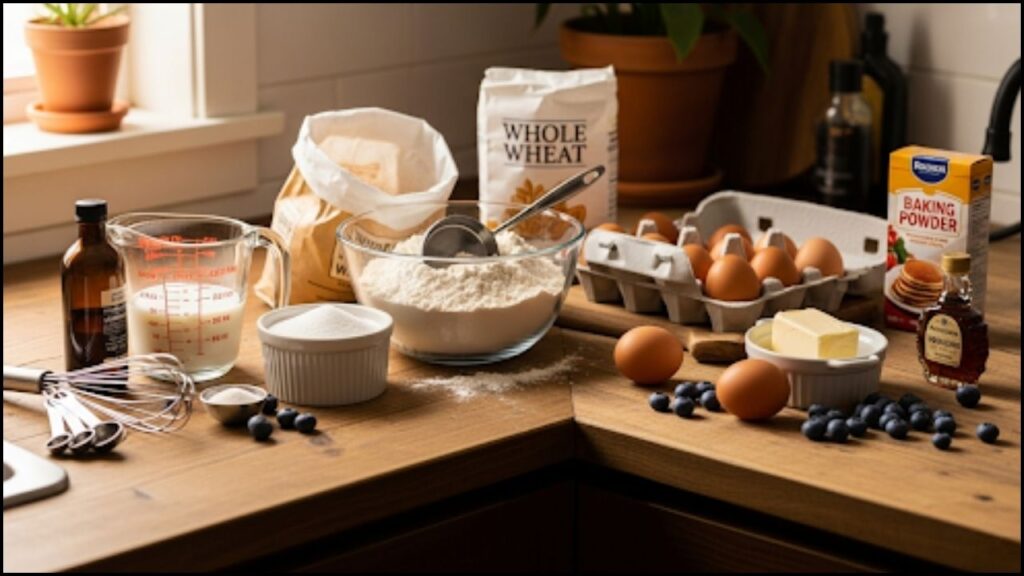
- 1½ cups whole wheat flour (look for a fine-grind variety if you can!)
- 2 tablespoons granulated sugar (or a healthier option like maple syrup or honey)
- 2 teaspoons baking powder
- ½ teaspoon baking soda
- ½ teaspoon salt
- 1¼ cups buttermilk
- 1 large egg
- 2 tablespoons unsalted butter, melted, plus more for the pan
- 1 teaspoon vanilla extract
A Note on Ingredients: Baking powder and baking soda are our secret weapons for creating that fluffy texture. Baking powder is double-acting, meaning it creates bubbles when it gets wet and again when it gets hot. The baking soda, on the other hand, reacts with the acid in the buttermilk, giving us an extra lift. The combination is what makes these pancakes so light.
How to Make the Perfect Whole Wheat Pancakes
Making pancakes is a bit of an art, but with a few simple steps, you’ll feel like a pro.
Step 1: Whisk the Dry Ingredients
In a large bowl, whisk together the whole wheat flour, sugar, baking powder, baking soda, and salt. Whisking here isn’t just about mixing; it’s about aerating the flour and evenly distributing the leavening agents. This simple step helps prevent dense, sad pancakes. I usually give it a good, vigorous whisk for about 30 seconds to make sure everything is well-combined.
Step 2: Combine the Wet Ingredients
In a separate, medium-sized bowl, whisk the buttermilk and egg together until the mixture is smooth. Stir in the melted butter and vanilla extract. The buttermilk is key here. Its acidity activates the baking soda, giving our batter the rise we want. If you don’t have buttermilk, you can make a quick substitute: just add 1 tablespoon of lemon juice or white vinegar to a liquid measuring cup, then fill it to the 1¼-cup line with regular milk. Let it sit for about 5 minutes until it thickens slightly.
Step 3: Marry the Wet and Dry Ingredients
This is the most crucial step, so pay close attention. Pour the wet mixture into the dry ingredients. Stir just until the flour is moistened. The batter will be lumpy, and that’s exactly what you want! Do not overmix. Overmixing develops the gluten in the flour, which will lead to a tough, rubbery pancake. You should still see some streaks of flour. A few lumps are a sign that you’re doing it right.
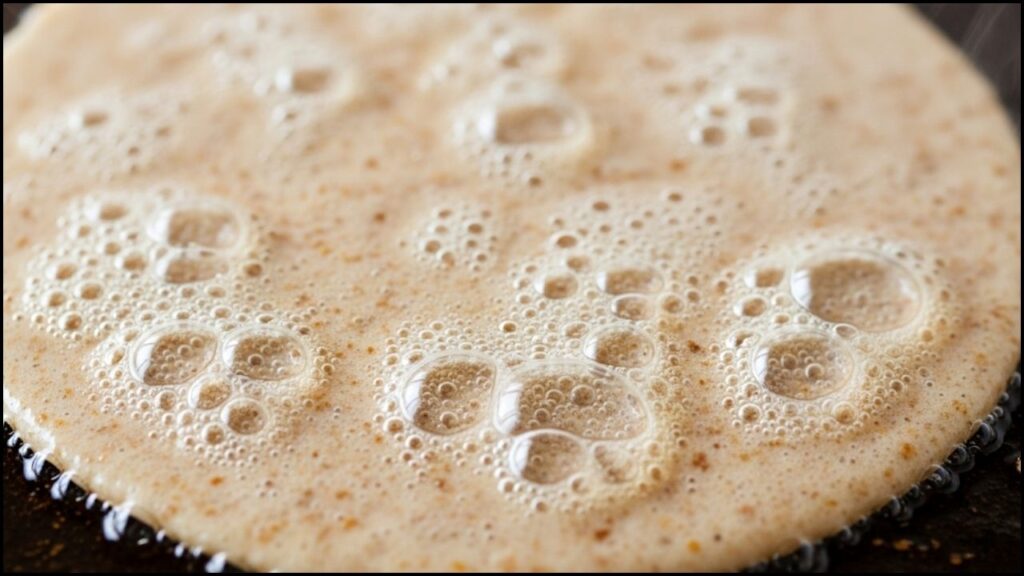
Step 4: Cook Your Pancakes
- Heat a nonstick griddle or a large skillet over medium heat. To test if your pan is ready, flick a few drops of water onto the surface. If they sizzle and disappear quickly, you’re good to go. Lightly grease the pan with a little butter.
- Pour about ¼ cup of batter for each pancake. The batter will be thick, so use the back of a spoon or a spatula to gently spread it into a circle.
- Cook for about 2-3 minutes, or until bubbles start to form and pop on the surface and the edges look set. This is your sign it’s time to flip. The bottom should be a beautiful golden brown.
- Flip the pancakes and cook for another 1-2 minutes on the other side, or until they’re cooked through.
Tips & Variations
- For a Healthier Boost: To make these even more nutritious, you can add some ground flaxseed or chia seeds to the dry ingredients. About 2 tablespoons is a good starting point.
- Add-ins: Who doesn’t love a pancake with a little extra something? Gently fold in chocolate chips, blueberries, or sliced bananas after you’ve mixed the batter. Just be careful not to overmix.
- The Best Toppings: Don’t stop at maple syrup! I love a good dollop of Greek yogurt, a sprinkle of toasted nuts, or a handful of fresh berries. A little dusting of powdered sugar always makes them feel extra special.
Final Disclosure on Recipe
Mastering a reliable pancake recipe is a game changer for any home cook, and this whole wheat pancakes recipe is one you’ll come back to again and again. It’s wholesome without feeling heavy, and it’s forgiving enough for a sleepy Saturday morning. Knowing how to create something this delicious from scratch is a gift you give yourself and the people you share it with. So go ahead, grab your griddle, and make a batch. You’ll be so proud of what you’ve created.
Decades-Old Family Recipe Reveals Breakthrough ‘Culinary Lift Technique’ for Pancakes