The Coziest White Chicken Chili You’ll Ever Make
This creamy white chicken chili recipe is a weeknight hero, perfect for home cooks. Learn to create a flavorful, satisfying bowl of white chicken chili with simple ingredients and easy-to-follow steps. This recipe is a keeper for any cozy meal
The first time I made white chicken chili, it was a chilly fall evening, and my family was craving something comforting and different. I’d always defaulted to a classic beef chili, but I was looking for a new weeknight hero. The result was this creamy, flavorful, and incredibly satisfying white chicken chili that quickly became a staple in our home. It’s got all the soul-warming comfort of traditional chili but with a bright, zesty twist that feels lighter and fresher.
This isn’t a complex recipe that’ll have you sweating over a stove for hours. Instead, it’s a simple, straightforward dish that delivers big flavor with minimal fuss. I’ll walk you through every step, from building a rich flavor base to achieving that perfect, creamy consistency. By the time you’re done, you’ll have a pot of chili that tastes like it’s been simmering all day, and you’ll feel like a pro.
Quick Recipe
- Preparation Time: 15M
- Cooking Time: 25M
- Total Time: 40M
- Type of dish: Main course
- Cuisine: American
- Recipe Yield: 6 servings
- Calories: Approximately 450 calories per serving (without toppings)
Why You’ll Love This White Chicken Chili Recipe
- Quick & Easy: Perfect for busy weeknights, this recipe comes together in about 30 minutes, especially if you use pre-cooked chicken.
- Deep Flavor: We’ll build layers of flavor with a simple blend of spices and aromatics that make this chili taste like it simmered for hours.
- Perfectly Creamy: We’ll show you how to get a rich, creamy texture without using any heavy cream, keeping it lighter and more balanced.
- Customizable: This recipe is a fantastic starting point for you to get creative with your favorite toppings and add-ins.
What You’ll Need: The Essential Tools
You don’t need any fancy equipment for this recipe. Just a few basics will get the job done!
- A large Dutch oven or heavy-bottomed pot.
- A wooden spoon or heatproof spatula for stirring.
- A sharp chef’s knife and a cutting board for chopping.
- A ladle for serving.
The Ingredients: Simple, Flavorful, and Accessible
One of the things I love most about this recipe is that it uses ingredients you probably already have in your pantry. We’re not looking for anything exotic here, just good, solid staples.
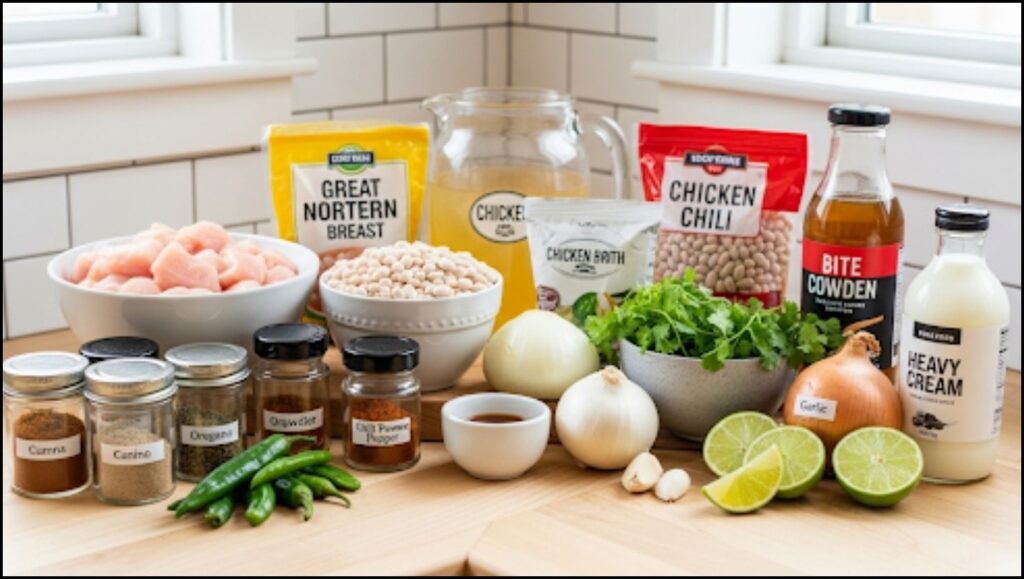
- Boneless, skinless chicken breasts or thighs: I prefer chicken thighs for their flavor and tenderness, but breasts work beautifully too. The goal is to have tender, shreddable chicken.
- Canned great northern beans: These beans are the traditional choice for a white chicken chili because they have a mild flavor and soft texture that blends seamlessly into the chili. You can also use cannellini beans or navy beans if that’s what you have on hand. Just be sure to rinse them thoroughly to wash away excess sodium.
- Onions, garlic, and jalapeño: This is our flavor trifecta! The onions and garlic build the aromatic base, and the jalapeño adds a subtle kick without making it overly spicy. If you’re sensitive to heat, you can remove the seeds and membranes from the jalapeño before dicing it. That’s where most of the spice lives!
- Chicken broth: Opt for a high-quality, low-sodium chicken broth. This gives us control over the salt level in the final dish.
- Spices: Cumin, chili powder, and oregano are the main players here, creating that signature warm, earthy flavor we all crave in a good chili.
- Green chiles: A small can of diced green chiles adds a subtle, smoky flavor that’s essential for this creamy white chicken chili.
- Flour or cornstarch: This is our secret to achieving that rich, creamy consistency without any dairy. A simple slurry of flour and water will thicken the chili beautifully.
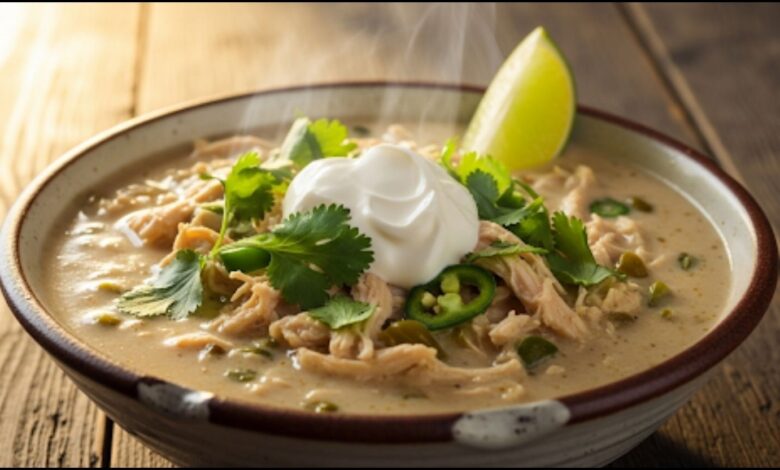
- Toppings: The best part! Don’t skimp on the toppings. Sour cream, fresh cilantro, shredded cheese, and avocado are all fantastic choices. I love adding a squeeze of fresh lime juice at the end—it brightens everything up and makes the flavors pop.
Step-by-Step Instructions: Creating the Perfect Bowl of Comfort
This recipe is all about building flavor from the ground up. Don’t rush these first few steps!
1. Sauté the Aromatics
Heat a little olive oil in your Dutch oven over medium heat. Add the diced onion and cook until it softens and becomes translucent, about 5-7 minutes. This step is crucial because it allows the onion’s natural sweetness to come out, which will form the foundation of our chili’s flavor. Next, stir in the garlic and diced jalapeño. Cook for just a minute or two until fragrant. Be careful not to burn the garlic—it can turn bitter very quickly.
2. Bloom the Spices
Now, it’s time to add the spices: cumin, chili powder, and oregano. Add them directly to the pot with the onions and garlic and stir constantly for about 30 seconds. You’ll notice the aroma intensifies almost immediately. This is called “blooming” the spices, and it releases their essential oils, deepening their flavor and making a huge difference in the final taste of your white chicken chili.
3. Build the Chili
Pour in the chicken broth, making sure to scrape up any browned bits from the bottom of the pot with your wooden spoon. Those little bits, called “fond,” are packed with flavor! Add the rinsed beans, the can of green chiles, and the cooked and shredded chicken. Give it a good stir to combine everything.
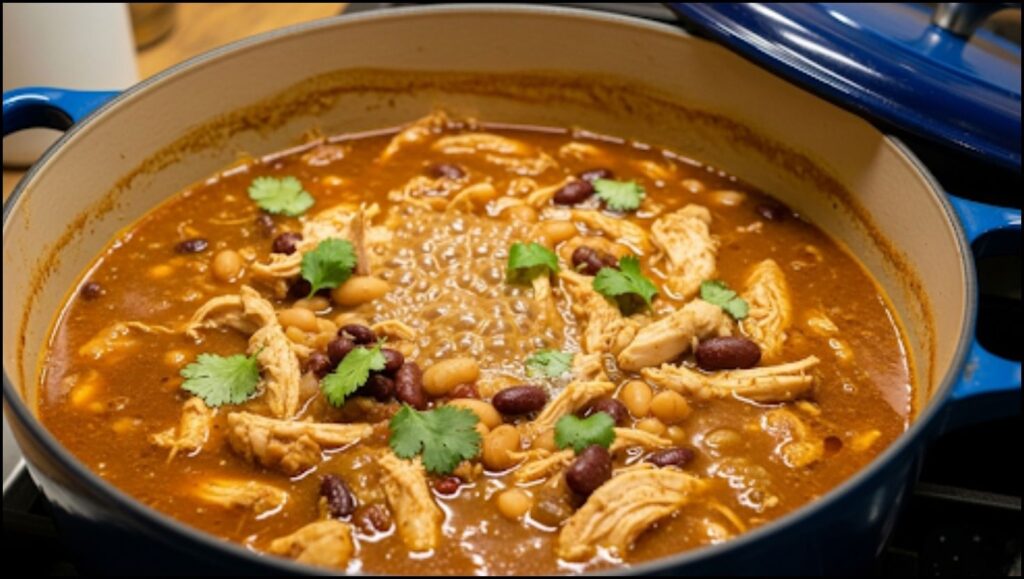
4. Simmer and Thicken
- Bring the chili to a gentle simmer. Reduce the heat to low, cover the pot, and let it simmer for at least 15-20 minutes. This gives all the flavors time to meld together.
- Here’s my trick for that luxurious, creamy texture: In a small bowl, whisk together a tablespoon of flour or cornstarch with a few tablespoons of cold water until you have a smooth slurry. Slowly pour this into the simmering chili, stirring constantly. The chili will begin to thicken almost instantly. Let it simmer for another 5 minutes to cook out any raw flour taste.
5. Season and Serve
- Give the chili a taste and adjust the seasoning. This is your moment to make it perfect! Add salt and pepper as needed. I find that a little extra cumin can sometimes be a nice touch here, too.
- Serve the chili hot, topped with all your favorite fixings. My go-to is a dollop of sour cream or Greek yogurt, a sprinkle of fresh cilantro, a little shredded Monterey Jack cheese, and a few tortilla chips for crunch.
Tips for Success
- Prep Ahead: To make this recipe even faster on a busy weeknight, you can chop your onion, garlic, and jalapeño ahead of time and store them in the fridge.
- Chicken Shortcut: If you’re really short on time, use a rotisserie chicken from the grocery store. It’s already cooked, seasoned, and makes for incredibly tender, shredded chicken.
- The Power of a Squeeze: Don’t skip the squeeze of fresh lime juice at the end! It’s a small step that makes a huge impact, adding brightness and cutting through the richness of the chili.
- Storage: This chili is fantastic for meal prep! It stores well in an airtight container in the fridge for up to 3-4 days. The flavors only get better overnight!
Why This Recipe Is a Keeper
This white chicken chili is more than just a meal—it’s a feeling. It’s the warmth you need on a cold day, the easy solution to a busy weeknight, and the crowd-pleaser that everyone asks you to make again. It’s a recipe that will not only fill bellies but also create memories around the dinner table. Give it a try, and I’m confident you’ll find yourself coming back to it again and again. Happy cooking!


Light, Bright, and Bursting with Flavor: Your New Go-To Asian Chicken Salad!


