The Ultimate Guide to Making Unforgettable Sweet Potato Doughnuts
Discover the joy of baking with our easy-to-follow recipe for sweet potato doughnuts. These incredibly moist, flavor-packed treats are the perfect way to welcome autumn. Get all our tips for a perfect batch every time!
There’s something truly special about the aroma of freshly made doughnuts wafting through the house. It’s a scent that promises comfort, warmth, and a little bit of indulgence. For years, I’ve been on a mission to perfect a doughnut recipe that not only captures that feeling but also adds a unique, wholesome twist. The result? These incredible sweet potato doughnuts. They are pillowy soft, wonderfully moist, and have a subtle, earthy sweetness that is simply irresistible. If you’ve ever been intimidated by the idea of making doughnuts at home, I’m here to tell you that you can absolutely do this. Let’s walk through it together, one simple step at a time.
Quick Facts about Recipe
- Preparation Time:
3H - Cooking Time:
30M - Total Time:
3H30M - Type of dish: Dessert / Breakfast
- Cuisine: American
- Recipe Yield: 12 doughnuts
- Calories: 360 kcal per doughnut (approximate)
Why You’ll Love This Sweet Potato Doughnut Recipe
| Key Takeaway | Description |
|---|---|
| Incredibly Moist & Flavorful | The sweet potato puree in these doughnuts isn’t just for color; it creates a wonderfully tender crumb that stays fresh for days. |
| Surprisingly Simple to Make | Don’t let the idea of homemade doughnuts scare you! This recipe uses straightforward techniques perfect for any home cook. |
| A Perfect Autumn Treat | With warm spices and the comforting flavor of sweet potato, these doughnuts are the essence of a cozy fall day. |
| Versatile Glaze Options | We’ll cover a classic glaze, but you can easily customize these with a maple glaze, cinnamon sugar, or even a cream cheese frosting! |
The Magic of Sweet Potatoes in Doughnuts
Before we dive into the recipe, let’s talk about our star ingredient: the sweet potato. You might be wondering why we’re adding a vegetable to our doughnuts. Well, mashed sweet potato does a few amazing things. First, it adds a natural sweetness, which means we don’t need to overdo it with refined sugar. Second, and most importantly, it contributes an incredible amount of moisture. This is the secret to a doughnut that doesn’t dry out after a few hours. The sweet potato ensures a tender, fluffy texture that is simply divine. It also gives our doughnuts a beautiful, warm orange hue that is so inviting. For this recipe, you can use canned sweet potato puree or make your own by baking a sweet potato until it’s very soft and then mashing it until smooth.
Essential Tools for Your Doughnut Adventure
One of the great things about this recipe is that you don’t need a lot of fancy equipment. Here are the basics you’ll want to have on hand:
- A Doughnut Cutter or Two Circle Cutters: A 3-inch cutter for the doughnut and a 1-inch cutter for the hole works perfectly.
- A Heavy-Bottomed Pot or Dutch Oven: This is crucial for maintaining a steady oil temperature for frying.
- A Kitchen Thermometer: Taking the guesswork out of the oil temperature is the key to perfectly cooked, non-greasy doughnuts.
- Mixing Bowls, Whisk, and a Spatula: Standard baking essentials.
- A Rolling Pin: To get our dough to the perfect thickness.
- Paper Towel-Lined Baking Sheets: For draining the freshly fried doughnuts.
Let’s Make Some Sweet Potato Doughnuts!
This is a yeasted doughnut recipe, which means we’ll be using yeast to give our doughnuts that classic light and airy texture. Don’t worry if you’re new to working with yeast; I’ll guide you through it.
Ingredients You’ll Need
This recipe makes about a dozen doughnuts.
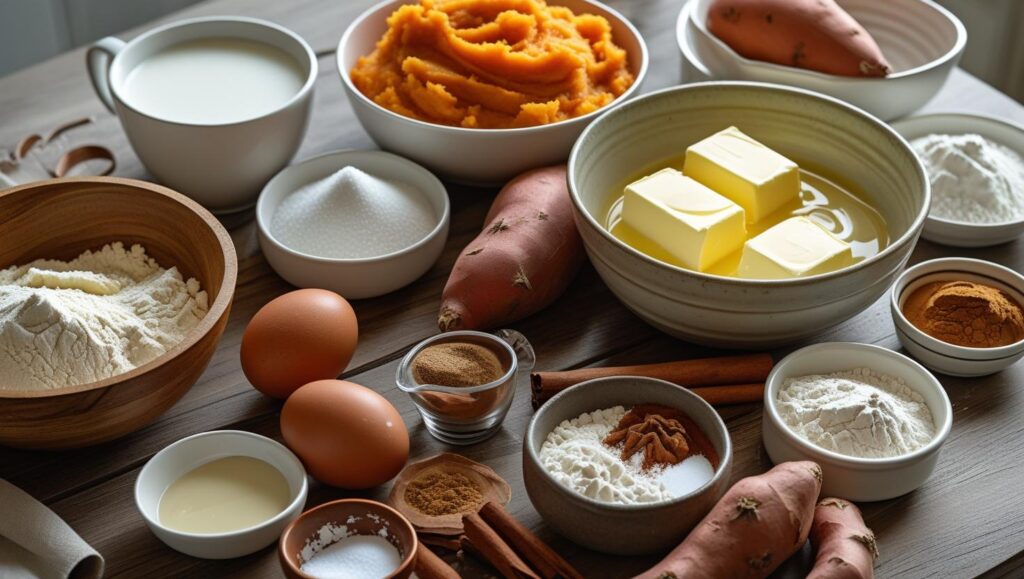
For the Doughnuts:
- 1 cup whole milk, warmed to about 110°F (43°C)
- 2 ¼ teaspoons (one packet) active dry yeast
- ¼ cup granulated sugar, plus a pinch
- 1 cup mashed sweet potato, cooled
- ¼ cup unsalted butter, melted and cooled
- 2 large eggs, at room temperature
- 1 teaspoon vanilla extract
- 4 cups all-purpose flour, plus more for dusting
- 1 teaspoon salt
- 1 ½ teaspoons ground cinnamon
- ½ teaspoon ground nutmeg
- ¼ teaspoon ground ginger
- Vegetable oil, for frying (about 6-8 cups)
For the Classic Glaze:
- 2 cups powdered sugar, sifted
- ¼ cup milk or heavy cream
- 1 teaspoon vanilla extract
Step-by-Step Instructions
1. Activating the Yeast
First things first, let’s wake up our yeast. In a large bowl, gently whisk together the warm milk, a pinch of sugar, and the yeast. The milk should feel like a warm bath – not too hot, or it will harm the yeast. Let this mixture sit for about 5-10 minutes. You’ll know the yeast is active when it becomes foamy and smells, well, yeasty! This step is so important because it ensures your doughnuts will rise properly.
2. Mixing the Dough
- To the foamy yeast mixture, add the remaining granulated sugar, the cooled mashed sweet potato, melted butter, eggs, and vanilla. Whisk everything together until it’s well combined. In a separate, medium-sized bowl, whisk together the flour, salt, cinnamon, nutmeg, and ginger.
- Now, gradually add the dry ingredients to the wet ingredients, mixing with a wooden spoon or spatula until a shaggy dough forms.
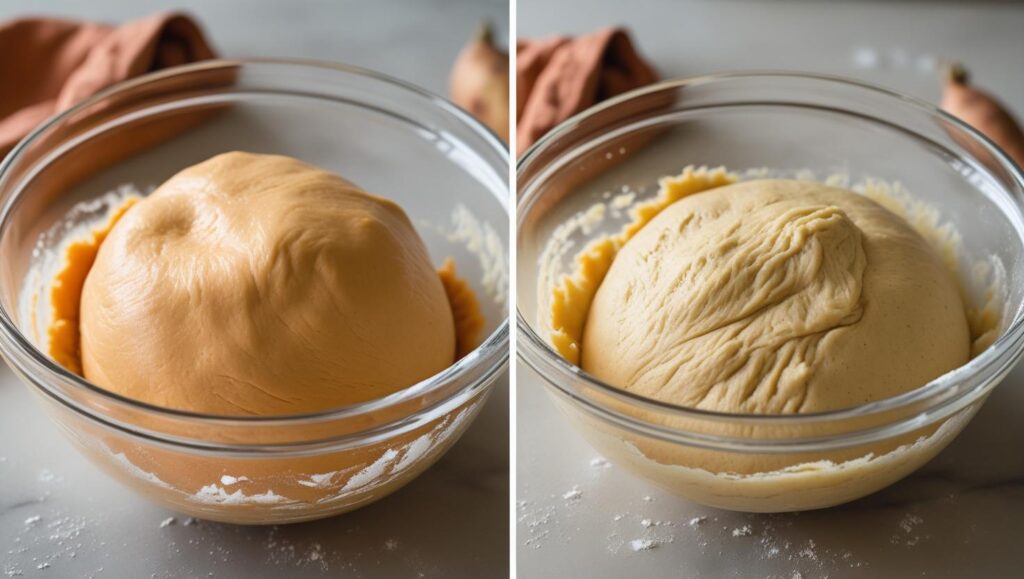
3. Kneading and the First Rise
- Turn the dough out onto a lightly floured surface. It will be a bit sticky, but that’s okay! Knead the dough for about 8-10 minutes. You’re looking for the dough to become smooth and elastic. If it’s still too sticky to handle, you can add a tablespoon of flour at a time, but try to add as little as possible to keep the doughnuts tender.
- Place the kneaded dough into a lightly oiled bowl, turning it over to coat the top. Cover the bowl with a clean kitchen towel or plastic wrap and place it in a warm, draft-free spot to rise for about 1 to 1 ½ hours, or until it has doubled in size.
4. Shaping Your Doughnuts
- Gently punch down the risen dough to release the air. On a lightly floured surface, roll the dough out to about ½-inch thickness. Using your doughnut cutter, cut out as many doughnuts as you can. You can gently re-roll the scraps to cut out a few more doughnuts, but be mindful not to overwork the dough.
- Place the cut doughnuts and doughnut holes on a parchment-lined baking sheet. Cover them loosely with a kitchen towel and let them rest for another 30-45 minutes. They will get a little puffy. This second rise is what gives them that extra light texture.
5. Frying to Golden Perfection
- While the doughnuts are resting, it’s time to get our oil ready. Pour your oil into your heavy-bottomed pot until it’s about 2-3 inches deep. Heat the oil over medium heat until it reaches 350-360°F (175-182°C). This is where your thermometer is your best friend. If the oil is too hot, the outside of the doughnuts will burn before the inside is cooked. If it’s too cool, the doughnuts will absorb too much oil and become greasy.
- Carefully place 2-3 doughnuts at a time into the hot oil. Don’t overcrowd the pot, as this can lower the oil temperature. Fry for about 1-2 minutes per side, or until they are a beautiful golden brown.
- Using a slotted spoon or spider, transfer the cooked doughnuts to your paper towel-lined baking sheets to drain any excess oil. Repeat with the remaining doughnuts and the doughnut holes.
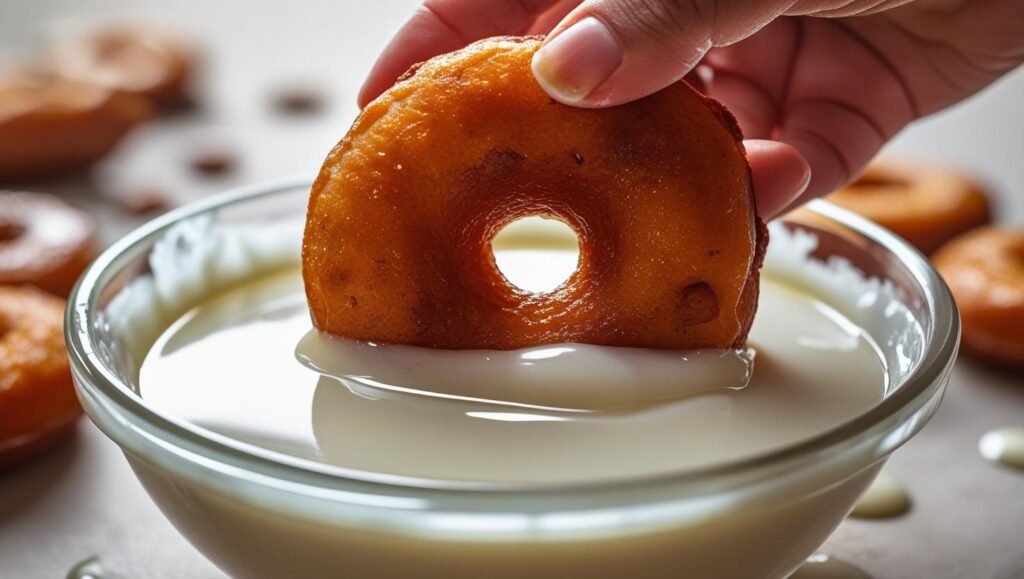
6. Glazing Your Masterpieces
- While the doughnuts are still slightly warm, let’s whip up the glaze. In a medium bowl, whisk together the sifted powdered sugar, milk (or cream), and vanilla until smooth.
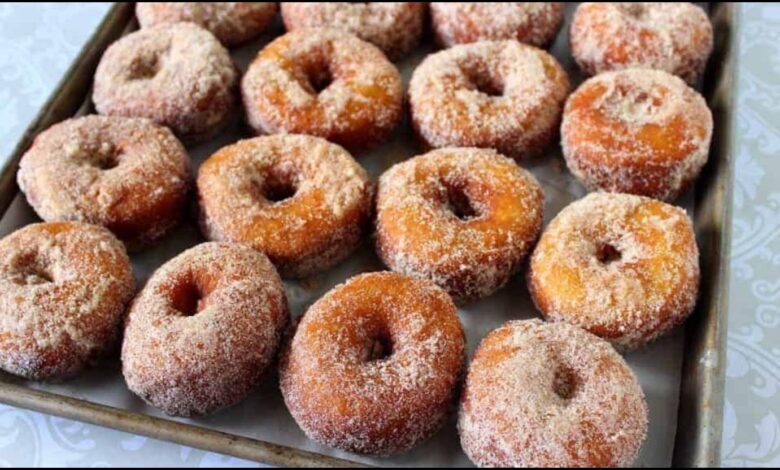
- Dip the top of each doughnut into the glaze and place it on a wire rack to let any excess drip off. The glaze will set as the doughnuts cool.
A New Fall Tradition
These sweet potato doughnuts have become a cherished tradition in my home, signaling the start of the coziest season of the year. They are a joy to make and even more of a joy to share. I hope this recipe empowers you to create your own delicious memories in the kitchen.


Happy baking!


