The Ultimate Rocky Road Brownies (Our Foolproof Family Recipe)
Create the ultimate Rocky Road Brownies with this foolproof recipe! We guide you step-by-step to a perfectly fudgy base, gooey marshmallow topping, and rich chocolate glaze. This is the decadent, crowd-pleasing treat you've been searching for.
There are moments that just call for a truly spectacular dessert. You know the ones I’m talking about—a family get-together, a neighborhood potluck, or just a Tuesday night when you need a serious chocolate fix. For years, my go-to solution has been this recipe for Rocky Road Brownies.
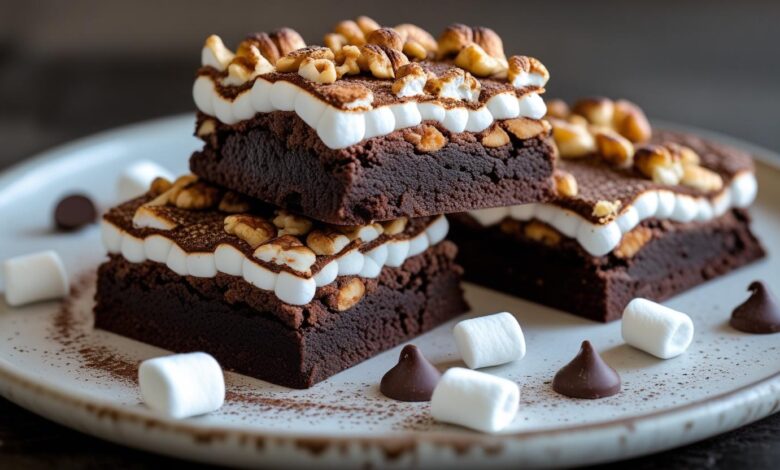
Forget everything you think you know about brownies from a box. We’re talking about a rich, incredibly fudgy brownie base, a gooey layer of perfectly melted marshmallows, crunchy toasted nuts, and a silky chocolate glaze that holds it all together. This isn’t just a dessert; it’s an experience. And I promise, you can absolutely make them at home.
Ready to fill your kitchen with the best smell on earth? Let’s get baking!
Quick Facts about Recipe
- Preparation Time: 20M
- Cooking Time: 28M
- Total Time: 3H48M (This includes a recommended 3-hour cooling and setting time for perfect slices)
- Type of dish: Dessert
- Cuisine: American
- Recipe Yield: 24 brownies
- Calories: 320 kcal per brownie (approximate)
Why This Recipe Works
| Key Takeaway | Description |
|---|---|
| Truly Fudgy, Not Cakey | We use a specific ratio of melted chocolate, butter, and just enough flour to create a dense, chewy brownie that serves as the perfect foundation. |
| Classic Rocky Road Flavor | Every bite is loaded with the nostalgic combination of deep chocolate, soft marshmallows, and crunchy walnuts for a perfect texture. |
| Simple, No-Fail Steps | I’ve broken down this recipe into easy-to-follow instructions, explaining the why behind each step so you can bake with confidence. |
| The Ultimate Crowd-Pleaser | These brownies look and taste impressive. They are a guaranteed hit wherever you take them and store beautifully for days. |
What Makes These Rocky Road Brownies So Special?
The secret to amazing Rocky Road Brownies isn’t just the topping—it’s the brownie itself. So many recipes simply pile marshmallows onto a standard brownie mix, which can be fine in a pinch. But to make something truly memorable, you need a brownie that can stand on its own.
Our journey starts with creating a brownie that is intensely chocolatey and has that perfect fudgy brownie recipe chew. We achieve this by using both melted chocolate and a little cocoa powder for a complex flavor. The real magic, however, is in the layering technique. By partially baking the brownies before adding the marshmallows, we ensure the marshmallows become gooey and toasted instead of dissolving completely into the batter. It’s a small extra step that makes all the difference.
Essential Ingredients for Your Shopping List
Gathering your ingredients first, or mise en place as the chefs say, makes the whole baking process smoother and more enjoyable. Here’s what you’ll need:
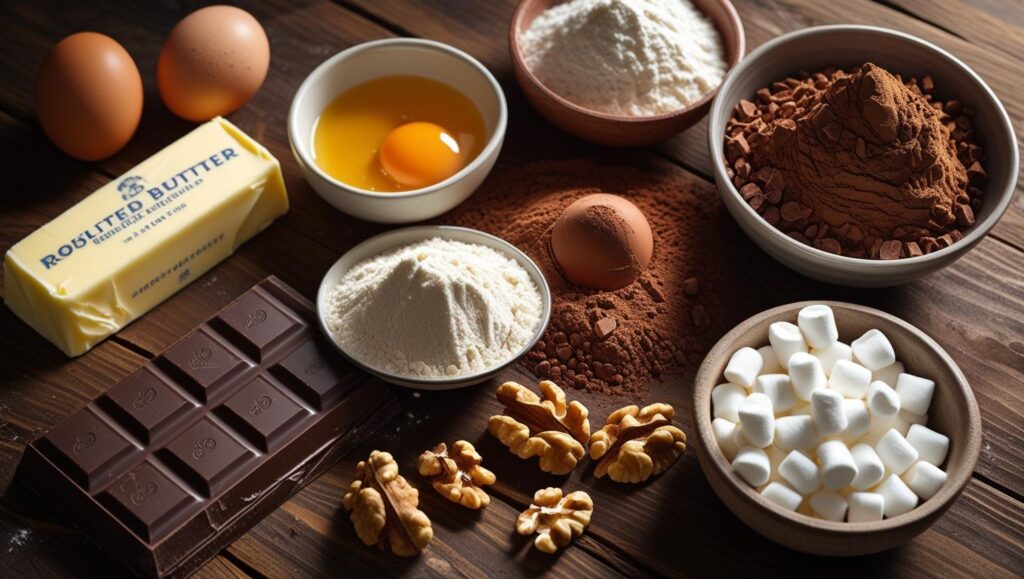
For the Fudgy Brownie Base:
- Unsalted Butter: Using unsalted butter lets you control the total amount of salt in the recipe. It’s a baker’s staple for a reason!
- Bittersweet or Semisweet Chocolate: Choose a good quality chocolate bar (around 60-70% cacao). This is the primary flavor of your brownies, so using the good stuff pays off.
- Granulated & Brown Sugar: Using both gives the brownies a crackly top and keeps them incredibly moist and chewy.
- Large Eggs: Make sure your eggs are at room temperature. They’ll mix into the batter more evenly, creating a smoother texture.
- All-Purpose Flour: We use just enough to give the brownies structure without making them cakey.
- Unsweetened Cocoa Powder: This adds another layer of deep, dark chocolate flavor.
- Vanilla Extract & Salt: These are essential flavor enhancers that make the chocolate taste even more chocolatey.
For the Famous Rocky Road Topping:
- Mini Marshmallows: Mini marshmallows are key! They create the perfect melted layer without being overwhelmingly large.
- Toasted Nuts: I love using walnuts or pecans. Toasting them in a dry skillet for a few minutes before using them awakens their flavor and makes them extra crunchy.
- Chocolate Chips: These will be melted to create the final, glorious chocolate glaze on top. Semisweet or milk chocolate chips both work wonderfully here.
Let’s Bake! Step-by-Step Instructions
Don’t be intimidated by the steps! I’ll walk you through each one. Think of it as a fun project, and the reward is absolutely worth it.
Step 1: Prep Your Pan and Oven
First things first, preheat your oven to 350°F (175°C). Having the oven ready to go ensures your brownies start baking immediately and cook evenly.
Next, prepare a 9×13-inch baking pan. My best tip for easy removal and cleanup is to create a parchment paper “sling.” Cut a piece of parchment paper so it fits the bottom of the pan with extra hanging over the two long sides. Lightly grease the pan, place the parchment inside, and then grease the parchment itself. Those overhangs will act as handles to lift the brownies out easily later.


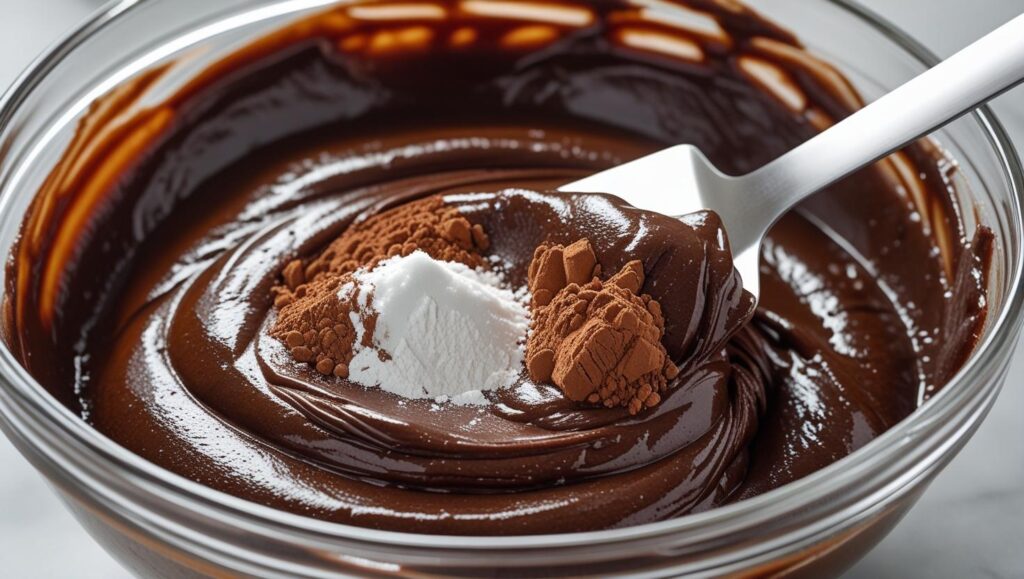
Step 2: Making the Fudgy Brownie Batter
In a medium, microwave-safe bowl (or in a double boiler), melt the butter and the chopped bittersweet chocolate together. I like to do this in the microwave in 30-second bursts, stirring in between, until it’s smooth and glossy. Be careful not to scorch it!
Set that aside to cool slightly. In a large bowl, whisk together the granulated sugar, brown sugar, and room-temperature eggs until the mixture is pale and has thickened slightly, about 2 minutes. Then, whisk in the vanilla extract.
Pour the slightly cooled chocolate mixture into the egg and sugar mixture and whisk until just combined.
Step 3: The First Bake
Pour the beautiful batter into your prepared pan and spread it into an even layer with your spatula.
Bake for 22-25 minutes. This first bake is crucial. You want the brownies to be set around the edges but still slightly soft in the center. A toothpick inserted in the middle should come out with moist, fudgy crumbs attached, not wet batter or completely clean. This is the secret to a perfect fudgy brownie recipe.
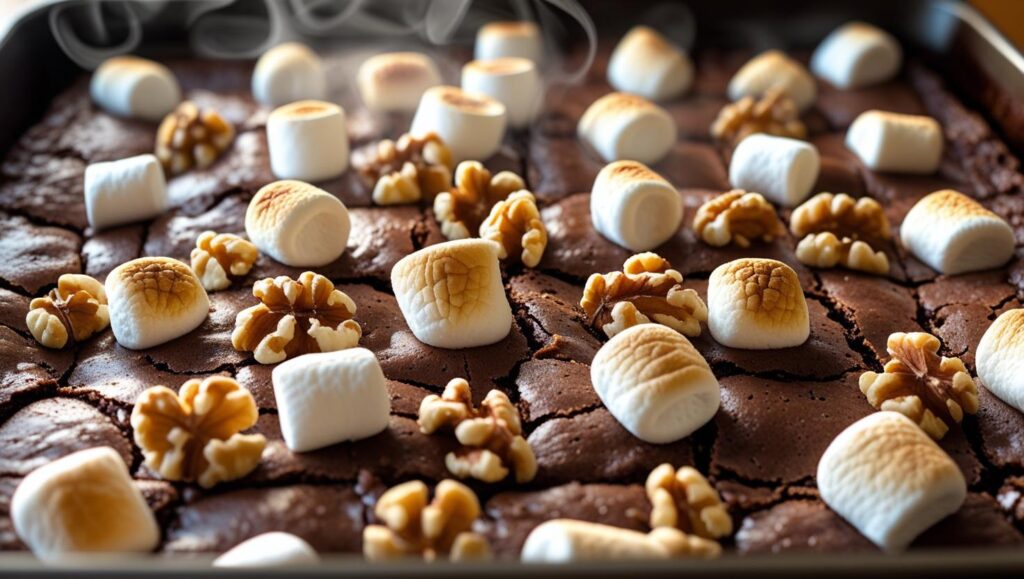
Step 4: Assembling the Rocky Road Topping
Remove the brownies from the oven. Working quickly while they are still hot, sprinkle the mini marshmallows and toasted nuts evenly over the top.
Step 5: The Final Chocolate Glaze
While the brownies are finishing in the oven, quickly melt your chocolate chips in the microwave.
Once you take the brownies out with their puffy marshmallow topping, immediately pour the melted chocolate over them. Use an offset spatula or the back of a spoon to gently spread the chocolate into an even layer over the marshmallows and nuts. The heat from the brownies will help keep the chocolate spreadable.
Step 6: The Hardest Part – Patience!
I know it’s torture, but you must let the brownies cool completely before cutting them. This allows the chocolate to set and the brownie to firm up, ensuring you get clean, beautiful squares.
For best results, let them cool at room temperature for about an hour, then transfer the pan to the refrigerator for at least 2-3 hours (or even overnight). Once they are fully chilled and firm, you can use your parchment sling to lift the entire block of brownies out of the pan.
My Top Tips for Perfect Brownies Every Time
- Don’t Overbake the Brownie Base: This is the number one rule for fudgy brownies. It’s better to err on the side of slightly underbaked, as they will continue to set as they cool.
- Toast Your Nuts: I can’t say this enough! It takes 5 minutes and adds an incredible depth of flavor that raw nuts just don’t have.
- Use Room Temperature Eggs: Cold eggs can cause the melted chocolate and butter mixture to seize up, resulting in a clumpy batter.
- For Clean Slices: Once the brownies are fully chilled, use a large, sharp knife. Run the knife under hot water, wipe it dry, and make a cut. Repeat this for every single cut. It’s tedious, but you’ll get bakery-perfect squares.
A Recipe to Cherish
These Rocky Road Brownies have become more than just a recipe in my house; they’re a tradition. They are the perfect treat to share and a wonderful way to show people you care. The combination of rich chocolate, gooey marshmallow, and crunchy nuts is simply irresistible.
I hope you love making them as much as my family and I do. Happy baking!


