Let’s be honest, we’ve all been there. It’s lunchtime, you’re starving, and the thought of another boring sandwich is just… deflating. You want something quick, but you’re craving something special—something that tastes like it came from a cozy little café. This, my friends, is where my life-saving red pepper and goat cheese panini comes in. It’s the perfect solution! In just a few minutes, you can create a warm, melty, and incredibly flavorful sandwich that feels truly gourmet. The tangy goat cheese, the sweet roasted red peppers, and the crispy, golden bread come together in a way that’s simply irresistible. Trust me, once you try this, you’ll be looking for excuses to make it again and again.
Quick Recipe
- Preparation Time: 5M
- Cooking Time: 10M
- Total Time: 15M
- Type of dish: Sandwich, Main Course, Lunch
- Cuisine: Italian American
- Recipe Yield: 1 serving
- Calories: 580 kcal
Why You’ll Love This Recipe
| Takeaway | Description |
| Gourmet Flavor, Fast | Get that fancy café taste in your own kitchen in under 20 minutes. Perfect for a quick lunch or easy dinner. |
| Simple, Quality Ingredients | With just a handful of ingredients, the quality of each one shines through for a truly delicious result. |
| Perfectly Balanced | The combination of creamy, tangy, sweet, and peppery flavors is simply divine. |
| So Easy to Customize | I’ll give you the classic recipe, but it’s a fantastic base for adding your own favorite ingredients. |
Why This Red Pepper and Goat Cheese Panini Just Works
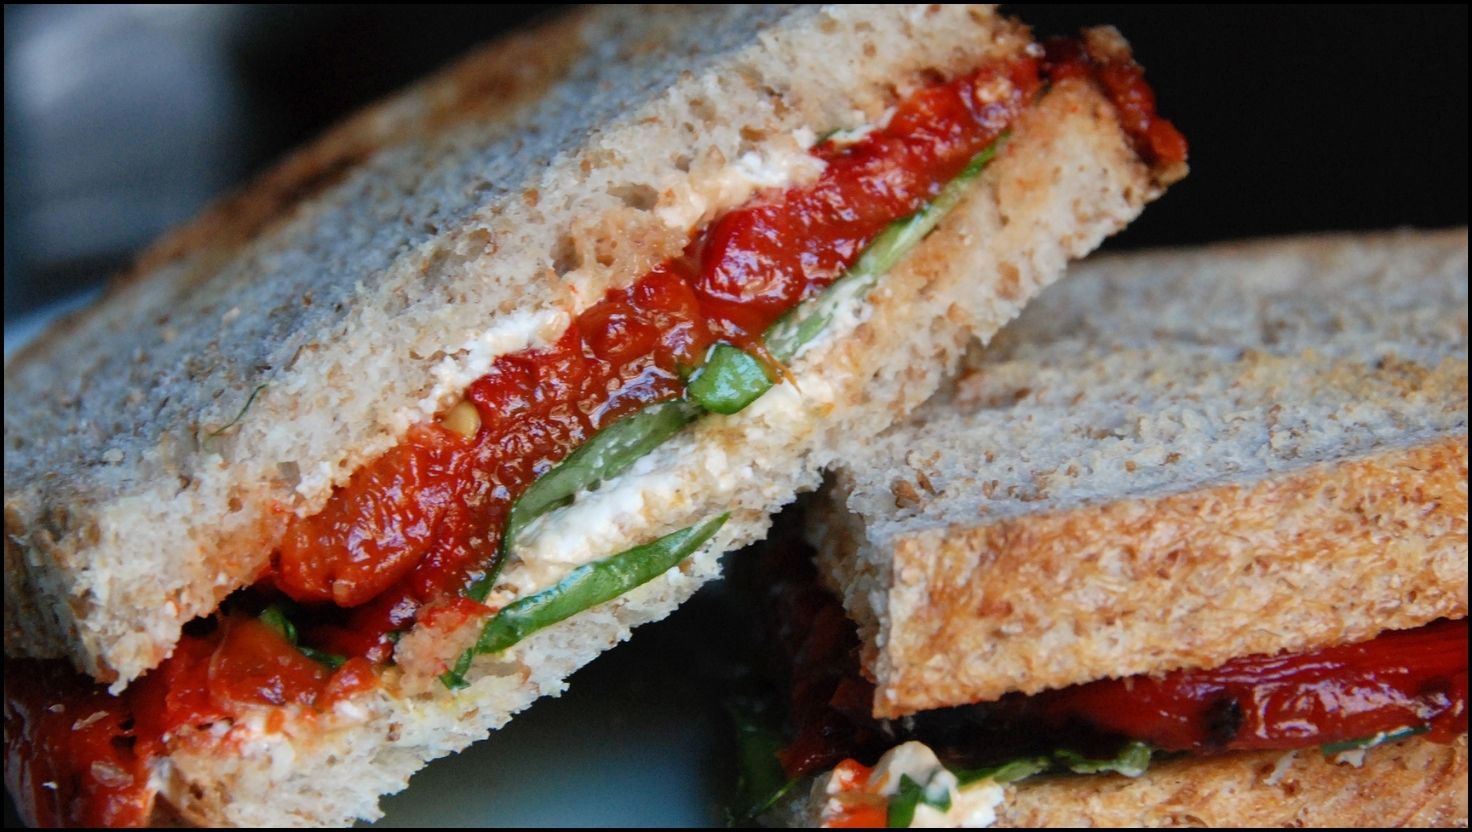
Over the years, I’ve made a lot of sandwiches, but I always come back to this one. There’s a certain magic in the combination. You have the soft, tangy creaminess of the goat cheese, which melts just enough to become luscious. Then you add the sweet and slightly smoky flavor of roasted red peppers. It’s a classic pairing for a reason!
What truly elevates this from a simple goat cheese sandwich to a culinary experience is the texture. The bread becomes perfectly toasted and crunchy, providing a satisfying contrast to the soft filling. A handful of fresh arugula adds a peppery bite that cuts through the richness. It’s a well-rounded, satisfying meal that never fails to impress. This isn’t just a recipe; it’s a reliable technique for a fantastic meal.
Gathering Your Ingredients
The beauty of this easy panini recipe lies in its simplicity. You don’t need a long shopping list, which means you can focus on getting good quality versions of a few key items.
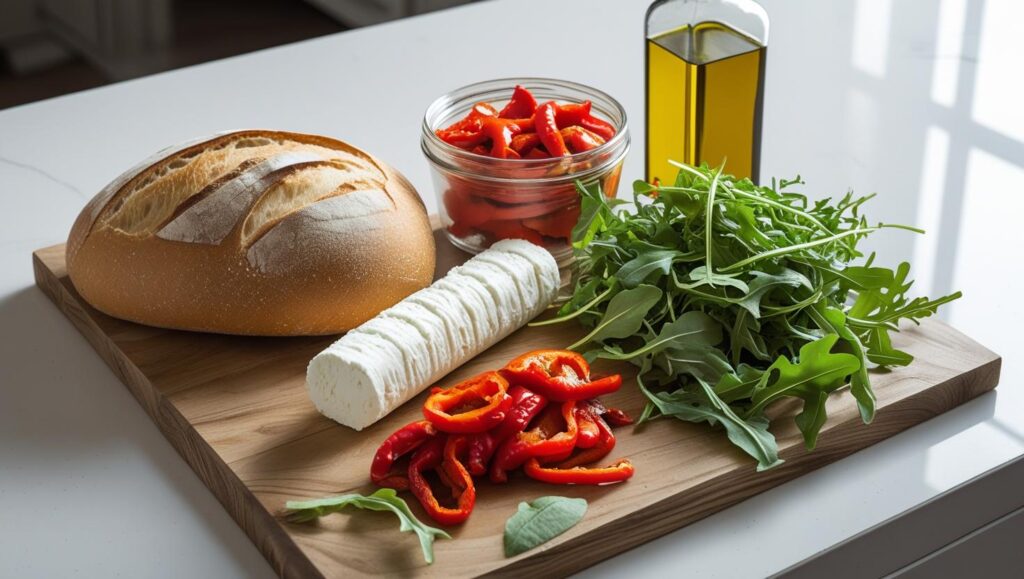
The Stars of the Show
- The Bread: This is the foundation of your panini, so choose well! You need something sturdy that can stand up to the fillings and the heat. I recommend a good ciabatta or a thick-sliced sourdough. They press beautifully and develop a fantastic crust.
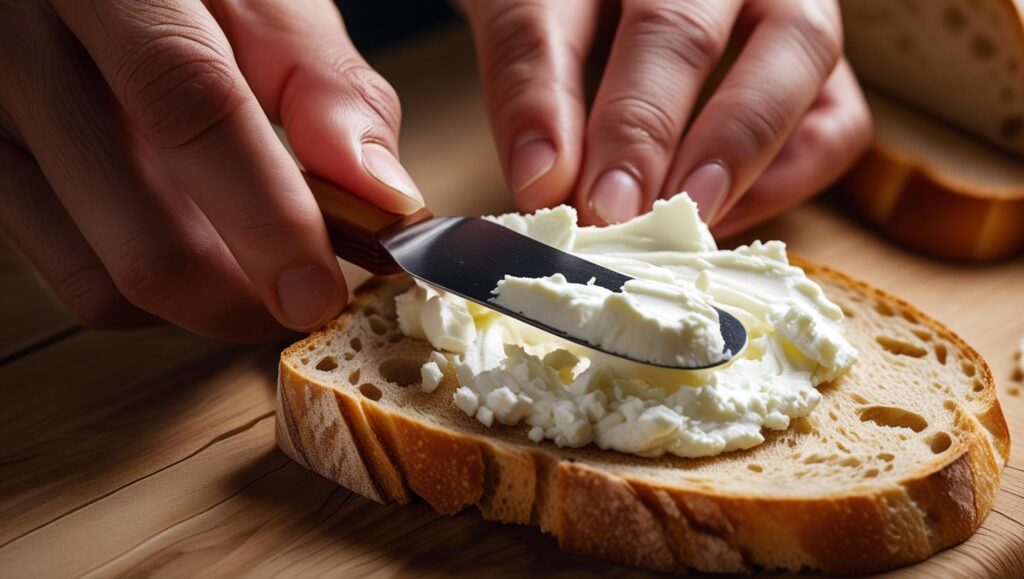
- Goat Cheese: You’ll want a soft goat cheese, often labeled as chèvre. Let it sit out for about 15-20 minutes before you start. Bringing it closer to room temperature makes it much easier to spread smoothly on the bread.
- Roasted Red Peppers: To keep things quick and easy, I almost always use jarred roasted red peppers. They are a fantastic pantry staple! Just be sure to pat them dry with a paper towel before using them. This is my secret weapon for preventing a soggy sandwich.
- Fresh Arugula: A small handful of arugula adds a fresh, peppery note that balances the richness of the cheese. Spinach also works if you prefer a milder green.
The Supporting Cast
- Butter or Olive Oil: For brushing the outside of the bread. This is what gives you that beautiful, golden, crispy exterior. I personally love the flavor of butter, but a good olive oil is just as delicious.
- Balsamic Glaze (Optional, but highly recommended!): A little drizzle of balsamic glaze inside the panini adds a touch of sweet acidity that ties everything together. You can buy it pre-made or make your own by simmering balsamic vinegar until it’s thick.
Essential Kitchen Tools
- Panini Press or a Heavy Skillet (like a cast-iron pan)
- Spatula
- Knife and Cutting Board
- Pastry Brush or a small spoon
Let’s Build the Perfect Panini: A Step-by-Step Guide
Alright, let’s get cooking! I’ll walk you through each step. It’s so simple, you’ll have it memorized after making it once.
Step 1: Prepare Your Bread
First, slice your ciabatta roll in half horizontally, or grab two slices of your sourdough. Lightly brush the outside of both pieces of bread with melted butter or olive oil. This is the most important step for achieving that signature crispy, golden-brown crust. Don’t skip it!
Step 2: Spread the Goat Cheese
Now for the creamy part. Divide your goat cheese and spread it generously over the inside of both pieces of bread. Getting a nice, even layer ensures you get that tangy goodness in every single bite.
Step 3: Layer the Peppers and Greens
Take your patted-dry roasted red peppers and arrange them in an even layer over the goat cheese on one slice of bread. Don’t just plop them on there; spreading them out makes for a better eating experience. Top the peppers with a small handful of fresh arugula.
Step 4: Grill to Golden Perfection
This is where the magic happens.
- If you have a panini press: Preheat it to a medium-high setting. Carefully place your assembled sandwich in the press, close the lid, and cook for 4-6 minutes, or until the bread is golden and crispy and the cheese is nicely melted.
- If you’re using a skillet: Heat a heavy skillet over medium heat. Place the sandwich in the pan and place something heavy on top of it. Another heavy pan or a brick wrapped in foil works great! Cook for 3-5 minutes per side, until both sides are golden brown and the cheese is gooey. The key here is medium heat; too high, and the bread will burn before the cheese melts.
Step 5: Rest and Slice
Once it’s perfectly grilled, remove the panini from the heat and let it rest for a minute. This helps the fillings set and prevents the cheese from oozing out everywhere when you slice it. Cut it in half diagonally (it just tastes better that way, I swear!) and serve immediately.
My Top Tips for Panini Success
- Don’t Overstuff It: As tempting as it is, overloading your panini can lead to a messy sandwich where the fillings slide out.
- Pat Those Peppers Dry: I’m saying it again because it’s that important! Excess moisture is the enemy of crispy bread.
- Control Your Heat: Medium heat is your friend. It allows the inside to get warm and melty while the outside gets perfectly toasted without burning.
- Give It a Squeeze: Whether you’re using a press or a pan, gentle, consistent pressure is what creates that dense, satisfying panini texture.
Fun Variations to Try
This roasted red pepper panini is a fantastic starting point. If you want to mix things up, here are a few ideas that my family loves:
- Add Some Protein: A few slices of prosciutto or some shredded rotisserie chicken are excellent additions.
- Try a Different Spread: A thin layer of olive tapenade or basil pesto along with the goat cheese is delicious.
- Switch Up the Greens: Baby spinach or fresh basil leaves are great alternatives to arugula.
A Recipe Worth Keeping
This panini is more than just a quick lunch; it’s a little piece of comfort and joy that you can whip up any day of the week. It proves that you don’t need complicated steps or a long list of ingredients to create something truly delicious and satisfying. I hope you love this recipe as much as I do. Now go enjoy your incredible, homemade panini!
Read More
The Absolute Best Red Pepper and Artichoke Panini (And How to Make It)
 The Ultimate Filipino Fried Chicken Recipe for Crispy, Juicy Perfection
 Unlock Flavor: How to Make the Perfect Avocado Veggie Panini Every Time
 The Easiest Weeknight Chicken Pizzaiola Dish You’ll Ever Make
 The Secret to a Perfectly Healthy Homemade Palak Paneer