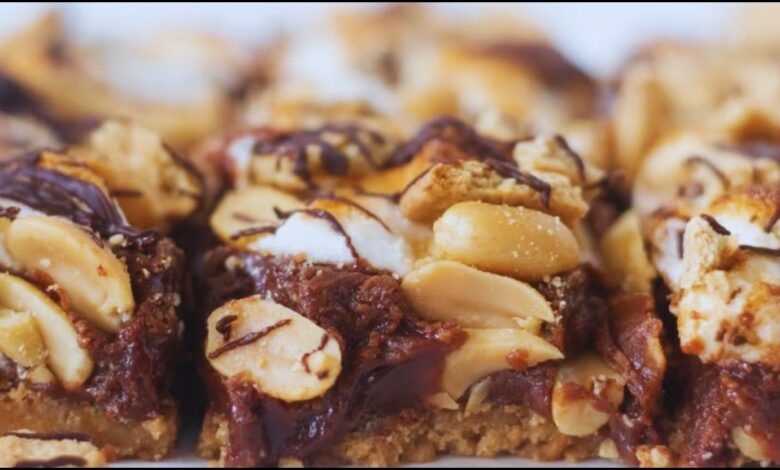
Peanut Butter S’mores Bars: Your New Favorite No-Bake Treat!
Dive into the delicious world of Peanut Butter S'mores Bars! This easy, no-bake recipe combines a buttery graham cracker crust with a rich peanut butter chocolate layer and perfectly toasted marshmallows. Get ready for your new favorite dessert that’s simple to make and utterly irresistible, perfect for any occasion!
Do you ever find yourself craving that gooey, chocolatey, toasted marshmallow goodness of s’mores, but the thought of building a campfire feels like too much work? Or maybe you just don’t have a fire pit in your backyard (I totally get it!). Well, my friends, I’ve been there, and that’s exactly why I created these Peanut Butter S’mores Bars. They deliver all the nostalgic flavors of your favorite campfire treat, but in an easy, no-bake bar that you can whip up right in your kitchen. Get ready to experience pure joy in every bite – these bars are unbelievably good and surprisingly simple to make!
Quick Recipe
- Preparation Time: 20M
- Cooking Time: 5M
- Total Time: 25M
- Type of dish: Dessert
- Cuisine: American
- Recipe Yield: 16 bars (based on an 8×8 inch pan, cut into 4×4 squares)
- Calories: Approximately 250-300 calories per bar (this is an estimate and can vary based on specific ingredients and brands).
Why You’ll Love These Peanut Butter S’mores Bars
- No Campfire Needed! Get all the s’mores magic without the smoke.
- Seriously Simple: Minimal ingredients and straightforward steps.
- Irresistibly Gooey & Crunchy: The perfect balance of textures.
- Peanut Butter Perfection: That classic s’mores flavor, elevated with a salty-sweet peanut butter twist.
Getting Started: The Magic Behind No-Bake Bars
One of the things I adore about no-bake recipes is how quickly they come together. There’s no oven preheating, no precise baking times to worry about. It’s all about chilling and allowing the ingredients to firm up into a cohesive, sliceable treat. For these Peanut Butter S’mores Bars, we’re leveraging the power of refrigeration to create a sturdy, yet delightfully tender, dessert that holds its shape beautifully.
The Foundation: A Perfect Graham Cracker Crust
Every great s’more starts with a solid graham cracker base, and our bars are no exception. For this recipe, we’re making a simple, buttery crust that provides that essential crunch and flavor.
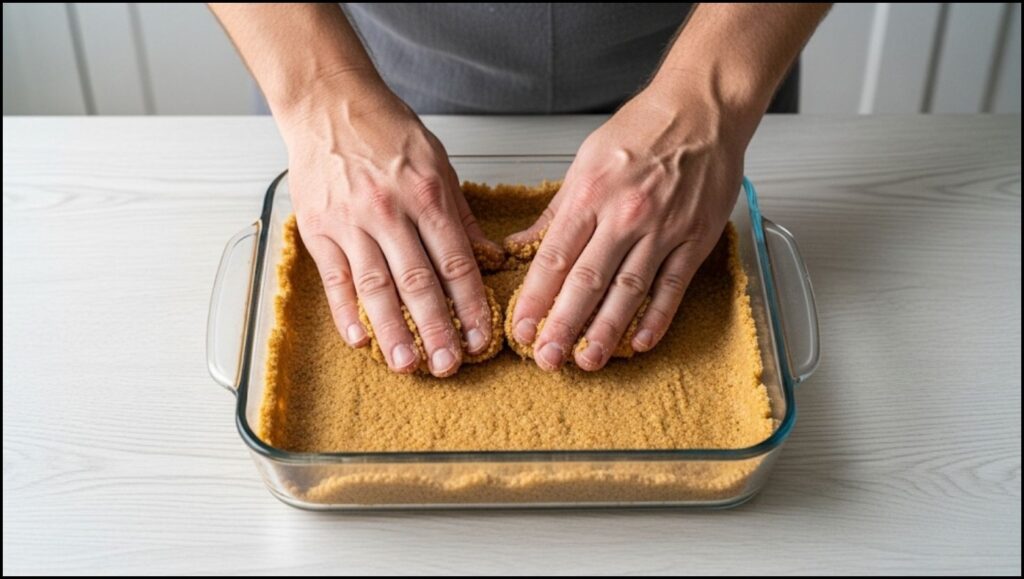
- Choosing Your Graham Crackers: You can use any brand of graham crackers you prefer. I find that about 1 ½ sleeves of classic honey graham crackers give you just the right amount for a sturdy crust. If you’re feeling adventurous, cinnamon graham crackers would also be a fantastic option, adding another layer of warmth.
- Crushing Them Right: The easiest way to get fine graham cracker crumbs is in a food processor. Just pulse them until they’re finely ground. If you don’t have a food processor, no worries! Place the crackers in a large zip-top bag and crush them with a rolling pin or the bottom of a heavy pan. The finer the crumbs, the more compact and stable your crust will be. This is important because it prevents your bars from falling apart when you slice them.
- Melted Butter: The Binding Agent: We’ll combine the crumbs with melted butter and a touch of sugar. The butter is crucial here; it acts as the glue, binding the crumbs together. Make sure to mix it really well until all the crumbs are moistened. Then, press the mixture firmly and evenly into your prepared pan. I like to use the bottom of a flat-bottomed glass or measuring cup to get a nice, compact layer. Pop it in the fridge while you prepare the next layers. This chilling step is essential for the crust to set properly, giving you clean slices later.
The Star of the Show: Peanut Butter Chocolate Layer
Here’s where the Peanut Butter S’mores Bars really come into their own! This creamy, rich layer combines the classic s’mores chocolate with the irresistible flavor of peanut butter.
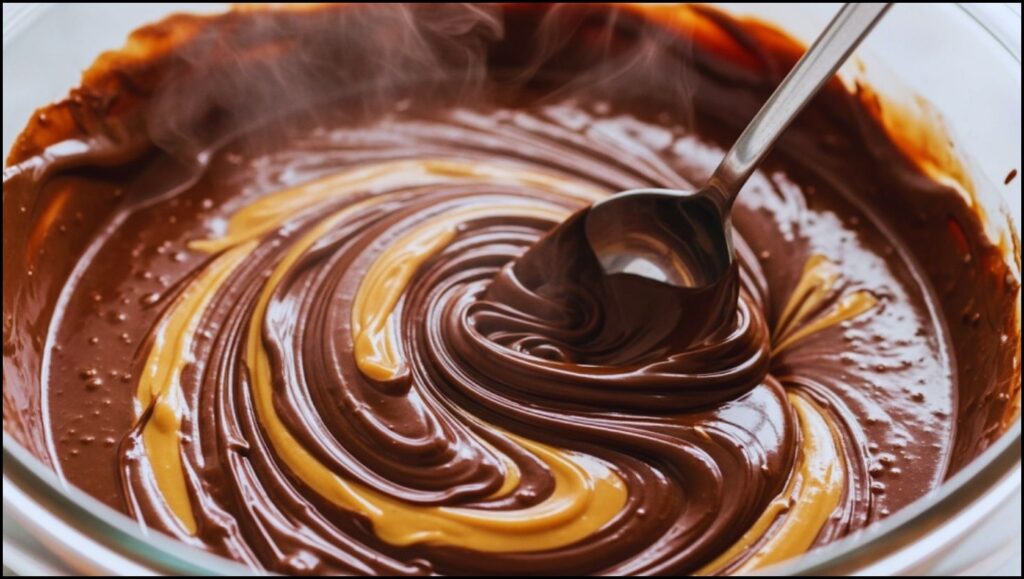
- Chocolate Choices: For the chocolate, I usually go with semi-sweet chocolate chips, as they offer a balanced sweetness that pairs well with the peanut butter. However, milk chocolate would make for an even sweeter, more traditional s’mores flavor. If you’re a dark chocolate fan, go for it! Just remember that a higher cacao percentage will result in a less sweet bar.
- Why We Melt Gently: We’ll melt the chocolate chips with peanut butter, a little butter, and a splash of milk or cream. I prefer to do this in a double boiler or very carefully in the microwave, stirring frequently. Overheating chocolate can cause it to seize or become grainy, so a gentle, slow melt is key to a smooth, luscious layer. The added milk or cream helps create a softer, more yielding chocolate layer once it sets, making the bars easier to bite into.
- Smooth and Spreading: Once melted and smooth, spread this gorgeous peanut butter chocolate mixture evenly over your chilled graham cracker crust. Don’t worry if it’s not perfectly smooth; the marshmallows will cover it! This layer not only adds incredible flavor but also helps to further set the crust underneath.
The Grand Finale: Toasted Marshmallow Topping
Now for the quintessential s’mores element: the marshmallows! This is where you get that beautiful golden, slightly charred top that screams “campfire.”
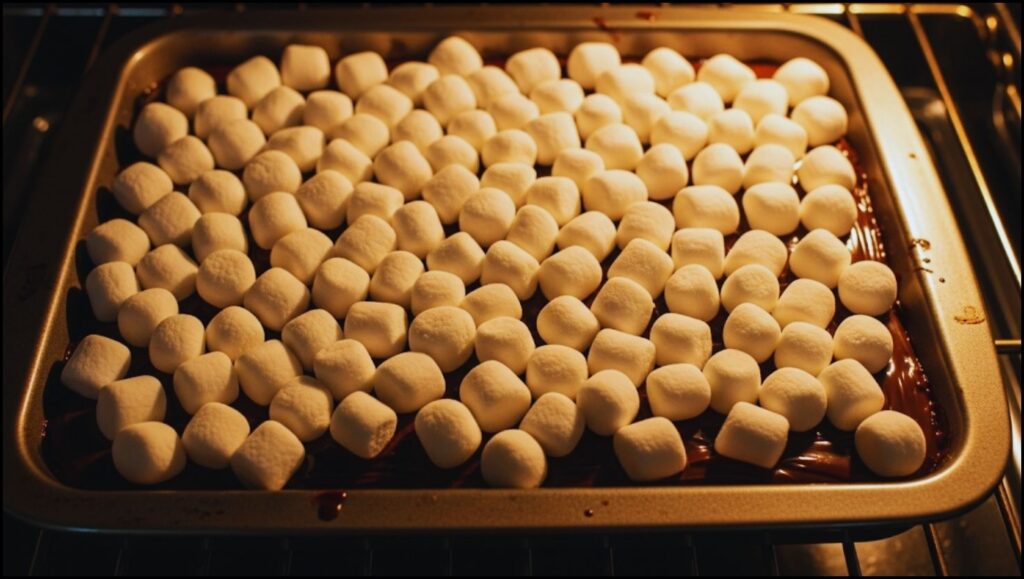
- Mini vs. Regular Marshmallows: I highly recommend using mini marshmallows for this recipe. They melt and toast more evenly and create a more uniform, appealing topping than larger marshmallows. If you only have regular-sized marshmallows, you can cut them into smaller pieces, but the mini ones truly are ideal for these bars.
- Toasting Your Marshmallows: There are a couple of ways to get that perfectly toasted marshmallow topping. My preferred method is using the broiler in your oven.
Broiler Method: Spread the marshmallows evenly over the chocolate layer. Place your baking dish under a preheated broiler. This part goes fast, so do not walk away! Watch them constantly, and once they’re golden brown and slightly puffy, pull them out. This usually takes only 1-3 minutes, depending on your broiler. A little char is great and adds to that s’mores flavor!
Kitchen Torch Method: If you have a kitchen torch, this is a fun way to get precise toasting. Spread the marshmallows on the bars and use the torch to brown them to your liking. This gives you excellent control.
Once toasted, let the bars cool completely, then chill them in the refrigerator for at least 2-3 hours (or even better, overnight!) before slicing. This chill time is absolutely critical for the bars to set up properly, allowing for clean, neat slices. Trust me, it’s worth the wait! For the cleanest cuts, you can even briefly pop the chilled bars in the freezer for 15-20 minutes before slicing with a hot, sharp knife.
Essential Tools for Peanut Butter S’mores Bars
- 8×8 inch baking dish: A glass or metal pan works perfectly.
- Food processor (optional, but recommended): For crushing graham crackers.
- Large mixing bowl: For the graham cracker crust.
- Heatproof bowl: For melting chocolate (if using microwave or double boiler).
- Saucepan: If using a double boiler.
- Spatula or off-set spatula: For spreading the layers.
- Measuring cups and spoons: Standard baking essentials.
- Parchment paper: To line the pan for easy removal.
My Top Tips for S’mores Bar Success
- Parchment Paper is Your Friend: Always line your baking dish with parchment paper, leaving an overhang on the sides. This makes lifting the entire slab of bars out of the pan incredibly easy, allowing for much cleaner cuts.
- Chill, Chill, Chill: I can’t stress this enough! Proper chilling is key to getting firm, sliceable bars. Resist the urge to cut them too soon.
- Hot Knife, Clean Slices: For the neatest slices, run your knife under hot water, wipe it dry, and then make your cut. Repeat for each slice. This prevents the chocolate from dragging and gives you beautifully presented bars.
- Storage: Store any leftover Peanut Butter S’mores Bars in an airtight container at room temperature for up to 3 days, or in the refrigerator for up to a week. They are delicious slightly chilled!
- Vary Your Chocolate: Feel free to experiment with different types of chocolate, like dark chocolate for a less sweet treat, or a mix of milk and semi-sweet for added complexity. This recipe is very forgiving and can easily be adapted to your taste.
A Treat for Any Occasion
These Peanut Butter S’mores Bars truly are a game-changer. They capture all the cozy, nostalgic charm of traditional s’mores, but in a convenient, shareable bar form that’s perfect for parties, potlucks, or just a quiet evening at home when a craving strikes. They’re a testament to how simple ingredients, when combined with a little care, can create something truly magical. So go ahead, gather your ingredients, and get ready to impress your family and friends with this delightful treat. You’ve got this!


Your New Favorite Summer Treat: Chocolate Chip Cookie Ice Cream Bars!


