The Ultimate Milk Chocolate Dulce de Leche Bars Recipe
Create incredible Milk Chocolate Dulce de Leche Bars with this easy, foolproof recipe. Featuring a buttery shortbread crust, a creamy caramel layer, and a smooth chocolate topping, it’s the perfect make-ahead dessert for any occasion. Simple steps, stunning results!
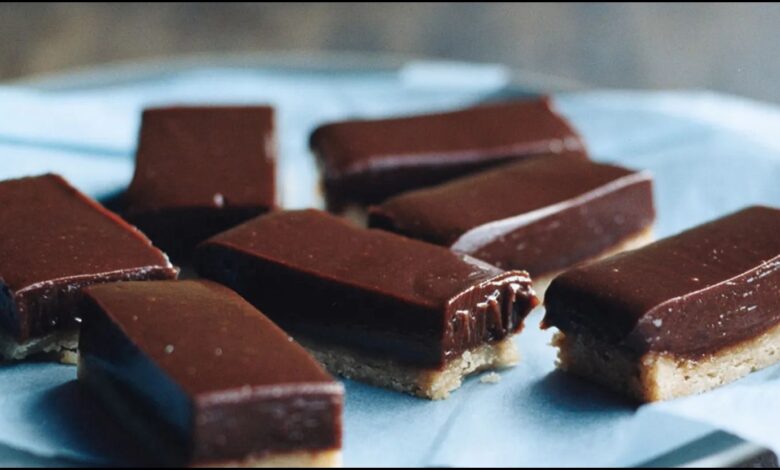
Have you ever needed a dessert that feels special but doesn’t take all day to make? I’ve been there more times than I can count. Whether it’s for a last-minute bake sale, a family get-together, or just a Tuesday night craving, I need a recipe I can count on. That’s where these Milk Chocolate Dulce de Leche Bars come in. They are my secret weapon. Imagine a buttery, melt-in-your-mouth shortbread crust, topped with a thick, luscious layer of creamy dulce de leche, and finished with a snap of smooth milk chocolate. They look impressive, taste heavenly, and are secretly so simple to create. Let’s make something delicious together!
Quick Recipe
- Preparation Time:
30M - Cooking Time:
25M - Total Time:
3H35M(This includes 2 hours 30 minutes of chilling time) - Type of dish: Dessert
- Cuisine: American
- Recipe Yield: 16 bars
- Calories: 225 kcal per bar
Why You’ll Fall in Love with These Bars
I first made a version of these bars for a neighborhood potluck. I wanted to bring something more exciting than standard brownies. When I saw the platter get cleared in under ten minutes, I knew I had a winner. This is the ultimate easy dessert recipe for anyone who loves the flavor of a Twix bar but wants something a little more grown-up and homemade.
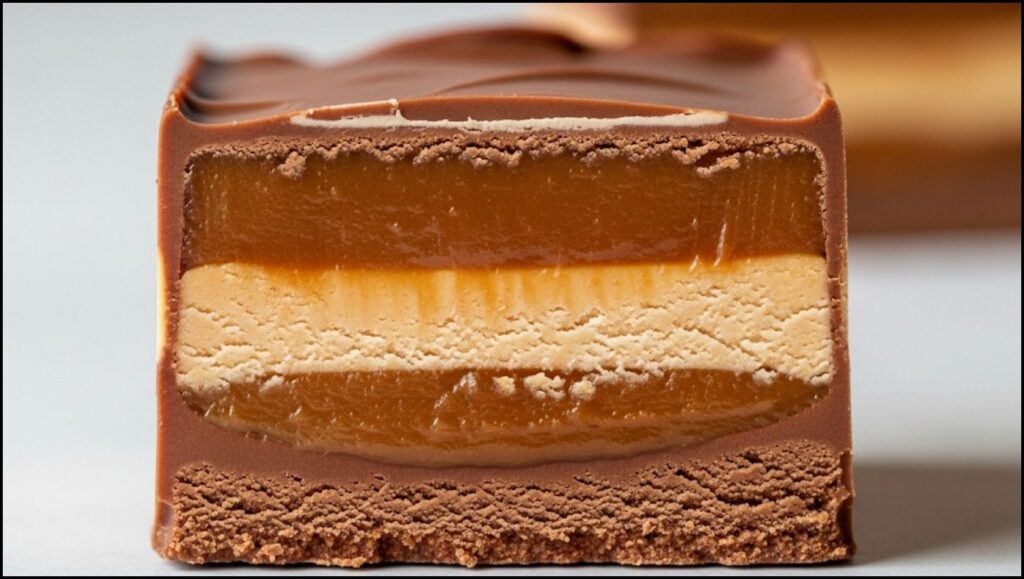
The magic is in the texture. You get the sandy, crumbly bite of the buttery shortbread crust, which is the perfect sturdy base. Then comes the star of the show: the dulce de leche. It’s softer and richer than regular caramel, with a deep, milky flavor that’s just addictive. The milk chocolate topping adds that classic sweetness and a satisfying finish. A tiny sprinkle of flaky sea salt cuts through the richness and makes every single flavor pop. These are truly decadent homemade caramel bars without the fuss.
What is Dulce de Leche, Anyway?
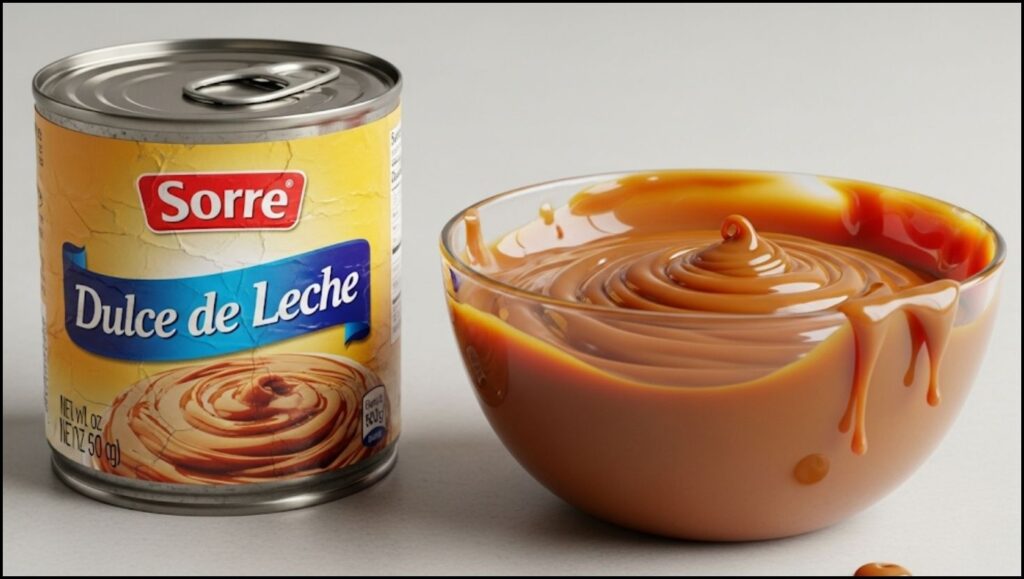
Before we dive in, let’s talk about dulce de leche. Don’t let the fancy name intimidate you! It’s a Latin American confection made by slowly heating sweetened milk. This process caramelizes the sugar and milk, resulting in a thick, creamy, and incredibly flavorful sauce.
It’s different from classic caramel, which is made by melting and caramelizing sugar, then adding cream and butter. Dulce de leche has a distinct milky, toffee-like taste. For this recipe, using a good-quality store-bought can of dulce de leche is my favorite shortcut. It saves a ton of time and delivers perfect results. You can usually find it in the international aisle or near the sweetened condensed milk at your grocery store.
Essential Ingredients
The beauty of this recipe is its simplicity. Here’s what you’ll need:
- For the Buttery Shortbread Crust:
- All-Purpose Flour: Provides the structure for our base.
- Unsalted Butter: Make sure it’s cold! Cold butter creates tiny steam pockets as it bakes, resulting in a flakier, more tender crust.
- Powdered Sugar: It dissolves easily, giving the shortbread a delicate, melt-in-your-mouth texture that granulated sugar can’t quite match.
- Vanilla Extract & Salt: For flavor, of course!
- For the Filling & Topping:
- Dulce de Leche: One can is all you need. Look for a thick, spreadable consistency.
- Milk Chocolate Chips: Milk chocolate is classic and complements the dulce de leche perfectly. You could use semi-sweet if you prefer a less sweet bar.
- A Little Oil or Butter (Optional): Just a teaspoon mixed with the chocolate helps it melt smoothly and gives it a nice sheen.
- Flaky Sea Salt: This is my non-negotiable finishing touch! It looks beautiful and balances the sweetness.
A Few Tools You’ll Need
You don’t need any fancy equipment, just a few kitchen staples:
- 8×8 inch square baking pan
- Parchment paper
- Mixing bowls
- Electric mixer (or a bowl and a whisk for a good arm workout!)
- Spatula
How to Make Milk Chocolate Dulce de Leche Bars (Step-by-Step)
Ready to get baking? I’ll walk you through every step. Just follow along, and you’ll have perfect bars in no time.
Step 1: Prepare the Buttery Shortbread Crust
This crust is practically foolproof. The key is not to overwork the dough.


- Prep Your Pan and Oven: Preheat your oven to 350circF (175circC). Line an 8×8 inch pan with parchment paper, leaving some overhang on the sides. This overhang will act as handles, making it super easy to lift the bars out later.
- Combine Dry Ingredients: In a medium bowl, whisk together the flour and powdered sugar.
- Cut in the Butter: Cube your cold butter and add it to the flour mixture. Using a pastry cutter or your fingertips, cut the butter into the flour until the mixture resembles coarse, sandy crumbs. Add the vanilla and mix until just combined.
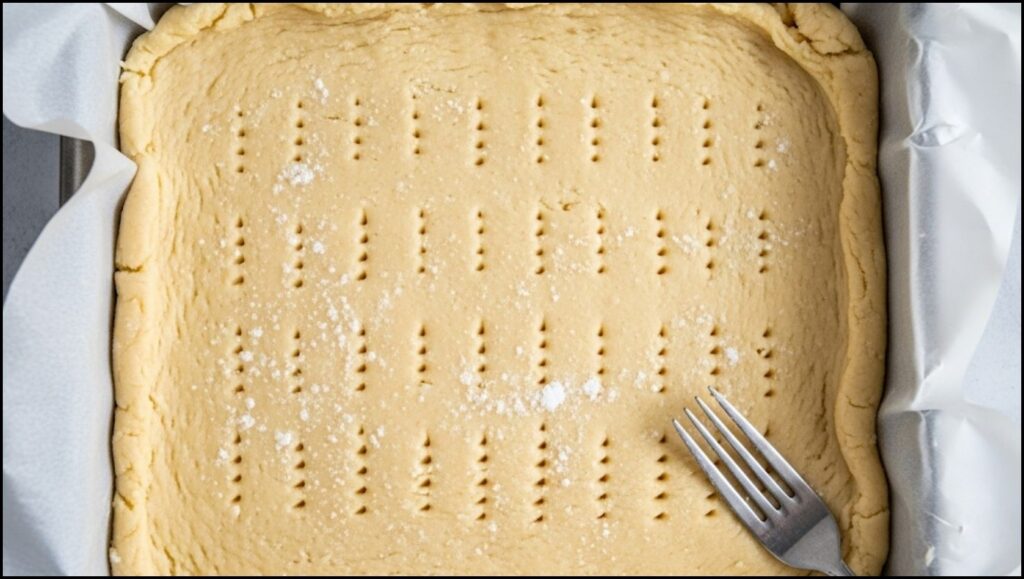
- Press and Bake: Dump the crumbly mixture into your prepared pan. Use your fingers or the bottom of a measuring cup to press it down into a firm, even layer. I find the measuring cup method gives you a really nice, flat surface. Prick the crust all over with a fork. This prevents it from puffing up while it bakes.
- Bake the Crust: Bake for 20-25 minutes, or until the edges are lightly golden brown.
Step 2: Add the Luscious Dulce de Leche Layer
- Warm the Crust: Once the crust is out of the oven, let it cool for just 5-10 minutes. You want it to be warm, not hot.
- Spread the Filling: Spoon the dulce de leche over the warm crust. The residual heat from the crust will help soften the dulce de leche, making it easier to spread. Use an offset spatula to gently guide it into an even layer, all the way to the edges.
- Let it Set: Place the pan in the refrigerator for about 20-30 minutes while you prepare the chocolate topping. This helps the dulce de leche firm up slightly.
Step 3: Finish with a Smooth Chocolate Topping
- Melt the Chocolate: Place the milk chocolate chips and the optional teaspoon of oil or butter in a microwave-safe bowl. Microwave in 30-second intervals, stirring in between, until the chocolate is smooth and completely melted. Be careful not to overheat it, or it can become grainy!
- Pour and Spread: Pour the melted chocolate over the chilled dulce de leche layer. Quickly spread it into an even layer.
- The Final Touch: Immediately sprinkle the top with flaky sea salt. This is key! If you wait too long, the chocolate will start to set, and the salt won’t stick.
Step 4: Chill and Slice
This might be the hardest part: waiting! But trust me, it’s essential.
- Chill Thoroughly: Place the pan in the refrigerator for at least 2-3 hours, or until the chocolate is completely firm. Do not skip this step! Chilling is what allows you to get those beautiful, clean slices.
- Slice and Serve: Once firm, use the parchment paper handles to lift the entire block out of the pan and onto a cutting board. For the cleanest cuts, I run a large, sharp knife under hot water, wipe it dry, and then make a slice. Repeat this for every cut. Slice into 16 small squares and enjoy!
A Treat Worth Making
These Milk Chocolate Dulce de Leche Bars have become a staple in my baking rotation, and I hope they become one in yours, too. They are the perfect blend of simple technique and show-stopping results. Every time you share them, you’re sharing more than just a dessert; you’re sharing a little bit of comfort and joy.
So go ahead, give them a try. I promise you’ll be so proud of what you create. Happy baking!
The Ultimate Rocky Road Brownies (Our Foolproof Family Recipe)


