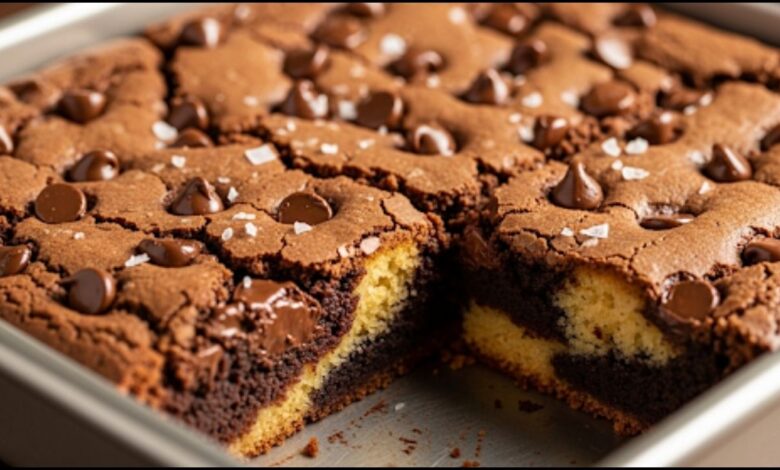
The Ultimate Chocolate Chip Cookie Brownie Recipe
This ultimate chocolate chip cookie brownie recipe solves the age-old dessert dilemma. With layers of rich, fudgy brownie and soft, chewy cookie, these bars are a perfect harmony of texture and flavor. Learn to make this impressive dessert from scratch with simple, clear steps.
Ever found yourself at a crossroads, staring into the pantry, torn between the rich, fudgy goodness of a brownie and the warm, chewy comfort of a chocolate chip cookie? We’ve all been there. It’s a classic dessert dilemma, and for years, I struggled with the choice. But what if you didn’t have to choose at all?
This chocolate chip cookie brownie recipe, affectionately known as the “brookie,” is the perfect solution. It’s a glorious mashup of two beloved classics, baked into one ridiculously delicious bar. We’re talking about a dense, intensely chocolatey brownie base, topped with a soft, buttery, and utterly perfect chocolate chip cookie layer. This isn’t just a dessert; it’s a dessert experience. With my step-by-step guidance and a few key tips, you’ll be baking these masterpieces with confidence, and everyone will be begging you for the recipe.
Quick Recipe
- Preparation Time: 20M
- Cooking Time: 40M
- Total Time: 1H
- Type of dish: Dessert
- Cuisine: American
- Recipe Yield: 16 squares (9×9 inch pan)
- Calories: 350 calories per square
What Makes This Recipe So Good?
- No Compromise on Flavor: Both the brownie and the cookie layers are made from scratch, ensuring each bite is packed with authentic, decadent flavor, not shortcuts.
- Perfectly Balanced Texture: We’ll use a special technique to create a fudgy brownie layer that complements the soft, chewy cookie on top, creating a harmony of textures.
- Simple & Straightforward: This recipe breaks down into two easy parts, making the entire process approachable even for a novice baker.
Gathering Your Ingredients and Tools
Before we get started, let’s make sure you have everything you need. Having all your ingredients prepped and your tools at the ready is my secret to a stress-free baking session. This is a technique called mise en place, a French term that simply means “everything in its place.” It’s a game-changer!
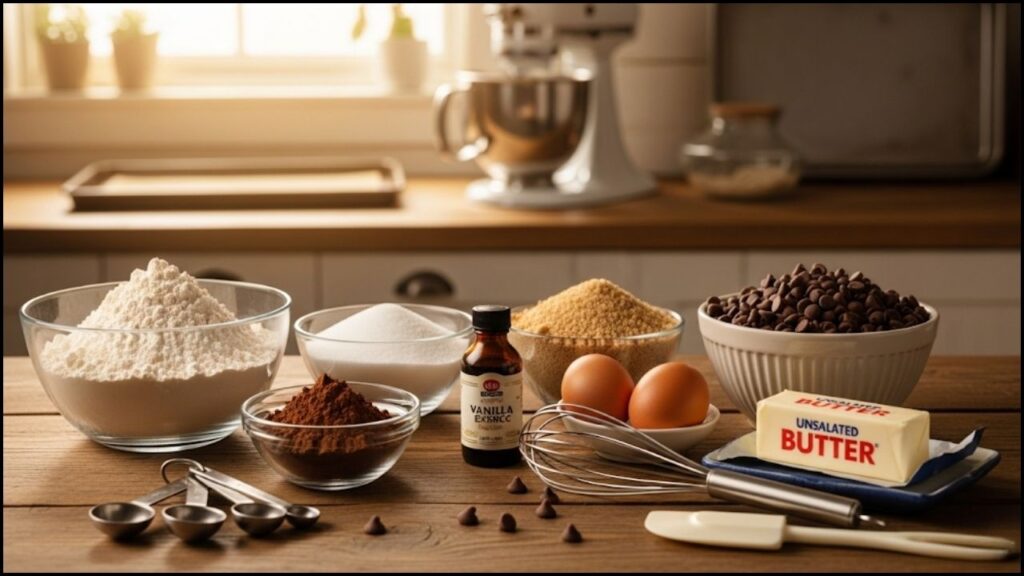
Ingredients:
- 1/2 cup (1 stick) unsalted butter, melted
- 1 cup granulated sugar
- 2 large eggs
- 1 teaspoon vanilla extract
- 1/2 cup all-purpose flour
- 1/3 cup unsweetened cocoa powder
- 1/4 teaspoon baking powder
- 1/4 teaspoon salt
- 1/2 cup semi-sweet chocolate chips
Tools & Materials:
- 9×9 inch baking pan
- Parchment paper
- Two medium-sized mixing bowls
- A whisk and a spatula
- Measuring cups and spoons
- Optional: Stand mixer or handheld electric mixer
Part 1: The Fudgy Brownie Layer
The foundation of a great brookie is a truly fudgy, not cakey, brownie. The secret to that intense, rich flavor and dense texture comes from using melted butter and cocoa powder, and making sure not to overbake it.
Instructions:
- Preheat & Prep: Preheat your oven to 350°F (175°C). Line a 9×9-inch baking pan with parchment paper, leaving an overhang on two sides to use as “handles” later. This makes removing the finished bars so much easier.
- Combine Wet Ingredients: In a mixing bowl, whisk together the melted butter and granulated sugar until well-combined. The heat from the melted butter helps the sugar dissolve, which contributes to that wonderfully crackled, glossy top on our brownies.
- Add Eggs and Vanilla: Whisk in the eggs and vanilla extract. Whisking well at this stage is crucial. You want the mixture to look thick and glossy, not just combined. This traps air, which helps create that signature crinkly top.
- Fold in Dry Ingredients: Sift together the flour, cocoa powder, baking powder, and salt into the wet mixture. Using a spatula, fold the dry ingredients in just until no streaks of flour remain. Be careful not to overmix! Overworking the gluten in the flour can lead to a tough, cakey brownie, and we’re aiming for that fudgy brownie texture. Finally, fold in the chocolate chips.
- Bake the Brownie Layer: Pour the batter into your prepared pan and spread it into an even layer. Pop it into the oven for 15 minutes while you prepare the cookie dough. This gives the brownie a head start, so it doesn’t get overbaked while the cookie layer finishes up.
Part 2: The Chewy Chocolate Chip Cookie Layer
While the brownie layer is getting a head start, we’ll whip up our cookie dough. The key to a soft, chewy cookie is the perfect ratio of brown sugar to white sugar and just the right amount of flour.
- Cream Butter and Sugars: In your second mixing bowl, use a hand mixer or a stand mixer with the paddle attachment to cream the softened butter, brown sugar, and granulated sugar together until light and fluffy. This can take 2-3 minutes. This step creates air pockets, which will make our cookie layer wonderfully soft.
- Add Egg and Vanilla: Beat in the egg and vanilla extract until just combined.
- Mix in Dry Ingredients: Add the flour, baking soda, and salt. Mix on low speed just until the flour is incorporated. As with the brownies, you don’t want to overmix. The dough will be a little thick, which is exactly what we want.
- Fold in Chocolate Chips: Use a spatula to gently fold in the chocolate chips. Set the bowl aside for a moment.

Part 3: Assembly & Final Bake
Now for the fun part! This is where our two delicious components become one.
- Layer the Dough: Carefully remove the brownie pan from the oven. Dollop spoonfuls of the cookie dough evenly over the warm brownie batter. Don’t worry about trying to spread the cookie dough into a perfect, uniform layer—it will naturally spread as it bakes. Having some of the brownie layer peeking through adds to the rustic, home-baked look.
- Final Bake: Return the pan to the oven. Bake for another 20-25 minutes, or until the cookie layer is a beautiful golden brown and the edges of the brownies are set. You might see a few fudgy crumbs on a toothpick inserted into the center, and that’s exactly what you want for a gooey center.
- Cool Completely: This is arguably the hardest, and most important, step. Let the bars cool completely in the pan on a wire rack for at least 2 hours. I know, I know, it’s a test of willpower! But cutting into warm brookies will result in a crumbly, messy result. As they cool, the layers set and the texture becomes perfectly fudgy and chewy.
- Slice & Serve: Once completely cooled, use the parchment paper overhangs to lift the entire slab out of the pan. Place it on a cutting board and slice into squares.
A Recipe to Keep Forever
This chocolate chip cookie brownie recipe is more than just a dessert; it’s a staple for any home baker’s repertoire. Whether you’re baking for a special occasion, a family gathering, or just because you need a little something sweet, these brookies deliver every time. They combine two classics into one perfect bite, a guaranteed crowd-pleaser that will have everyone asking for your secret. Enjoy the baking process, share the joy, and be proud of what you’ve created! Happy baking!
The Ultimate White Chocolate Cheesecake Brownies Recipe