
Do you ever crave a special treat to make a lazy weekend morning even better? Something that smells incredible as it bakes, filling your home with the warm scent of cinnamon and apples? My family has always loved these mornings, and over the years, I’ve perfected a recipe for Caramel Rolls with Apples and Walnuts that has become a tradition. It’s the kind of recipe that makes you want to linger at the table, sipping coffee and enjoying every single bite. I know what you might be thinking: “Making caramel rolls from scratch sounds complicated.” But I promise you, it’s not! This recipe breaks down all the steps so you can feel confident, even if you’re new to baking with yeast. The result is a buttery, tender roll, packed with sweet apples and crunchy walnuts, all swimming in a rich, homemade caramel sauce. It’s the perfect way to make any day feel a little more special.
Quick Recipe
- Preparation Time: 2H
- Cooking Time: 35M
- Total Time: 2H35M
- Type of dish: Dessert, Breakfast, Brunch
- Cuisine: American
- Recipe Yield: 12 rolls
- Calories: 450 calories per roll (approximately)
Why You’ll Love This Recipe
- Effortless Caramel Sauce: No need to stress over making a separate sauce. We’ll make a simple, foolproof caramel right in the pan.
- The Perfect Texture: The rolls are incredibly soft and fluffy, thanks to a simple, forgiving dough.
- Irresistible Flavor Combination: The sweet-tart apples, warm cinnamon, and toasty walnuts are a match made in heaven.
- Freezer-Friendly: You can assemble these the night before or freeze them for later, making them a great make-ahead option.
Ingredients: Simple, Flavorable and Accessible
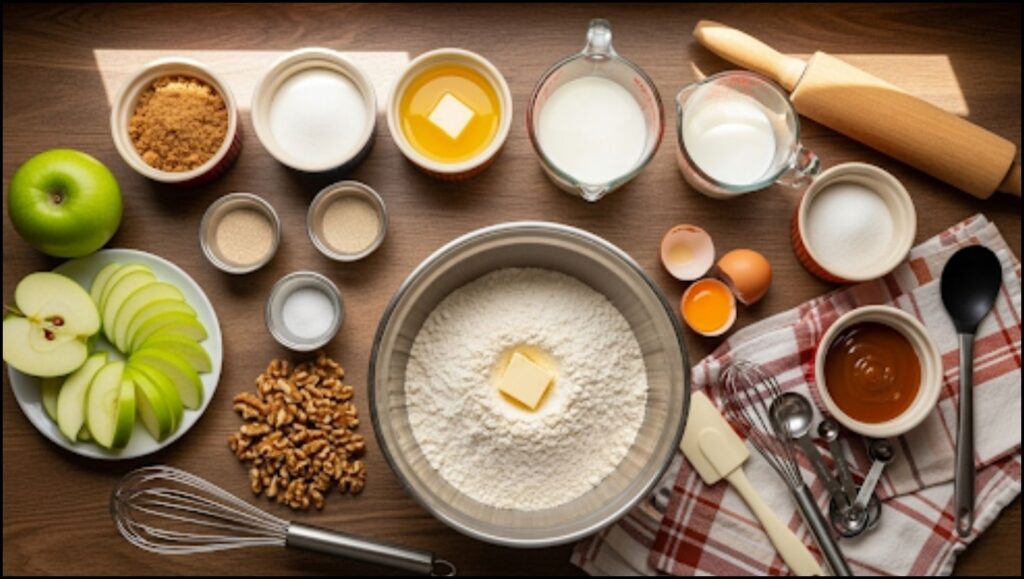
For the Caramel Topping:
- 6 tablespoons unsalted butter, melted
- ¾ cup packed light brown sugar
- 1 cup chopped walnuts
- 1 large apple, peeled, cored, and chopped into ¼-inch pieces (I prefer Honeycrisp or Granny Smith)
For the Dough:
- 1 ½ cups whole milk
- ½ cup granulated sugar
- 2 ¼ teaspoons active dry yeast (one standard packet)
- 6 tablespoons unsalted butter, melted
- 2 large eggs
- 1 teaspoon salt
- 4 ½ to 5 cups all-purpose flour, plus more for dusting
For the Filling:
- 6 tablespoons unsalted butter, melted and cooled
- ½ cup packed light brown sugar
- 2 teaspoons ground cinnamon
Essential Tools for Success
- Stand mixer with a dough hook attachment: While you can knead by hand, a stand mixer makes the dough-making process quick and effortless.
- 9×13-inch baking pan: A light-colored metal pan is best for even browning.
- Rolling pin: For rolling out the dough evenly.
- Small saucepan: For making the caramel sauce.
- Pastry brush: For brushing the dough with melted butter.
Step-by-Step Guide to the Best Caramel Rolls with Apples and Walnuts
This recipe has three main parts: the caramel sauce, the dough, and the filling. Let’s tackle them one by one.
Part 1: The Easy Caramel Sauce
This is the secret to a stress-free caramel roll. We’re not making a finicky, temperamental caramel. Instead, we’ll melt a few simple ingredients directly in the baking pan.
- Prepare the pan: In a small saucepan, melt the butter. Pour it into the bottom of your 9×13-inch baking pan. Sprinkle brown sugar evenly over the melted butter.
- Arrange the toppings: Scatter the chopped walnuts over the brown sugar mixture. This creates a crunchy, nutty bottom layer that will get perfectly toasty as the rolls bake.
- Add the apples: Core, peel, and chop your apples into small, uniform pieces. A good rule of thumb is to keep them about a quarter-inch in size. This ensures they soften nicely without getting mushy. Spread the chopped apples over the walnuts.
Tip from my kitchen: I like to use a firmer apple like Honeycrisp or Granny Smith because they hold their shape well during baking. You want a little bite of apple in every mouthful, not just apple sauce.
Part 2: The Soft and Fluffy Dough
A great caramel roll starts with a great dough. This recipe uses a classic enriched dough, meaning it has butter, milk, and eggs, which makes it incredibly tender. The rolls are light, airy, and the perfect vessel for all that delicious filling.
- Warm the milk: Heat the milk to about 105-115°F. It should feel like a warm bath, not hot. If it’s too hot, it will kill the yeast. If it’s too cool, the yeast won’t activate. I always check with a quick-read thermometer to be sure.
- Proof the yeast: In the bowl of your stand mixer, dissolve the sugar in the warm milk. Sprinkle the active dry yeast over the top and let it sit for about 5 minutes. You’ll know it’s ready when it gets foamy and smells a bit like bread. This step is called “proofing the yeast” and it’s how you check that your yeast is alive and active.
- Mix the dough: Add the melted butter, eggs, and salt to the yeast mixture. Gradually add 2 cups of the flour and mix on low speed with the dough hook until combined. Then, slowly add the remaining flour, a little at a time, until the dough comes together and pulls away from the sides of the bowl. It should be slightly sticky, but not wet.
- Knead: Increase the mixer speed to medium and knead for 8-10 minutes. The dough should become smooth, elastic, and pass the “windowpane test.” To do this, stretch a small piece of dough; if you can see light through it without it tearing, it’s ready!
- First rise: Place the dough in a lightly greased bowl, cover it with plastic wrap, and let it rise in a warm spot for about 1 hour, or until it has doubled in size.
Why this works: The long kneading process develops the gluten, which gives the rolls their structure and chew. The first rise gives the yeast time to work its magic, creating those airy pockets we all love.
Part 3: The Cinnamon-Apple Filling and Assembly
This is where the magic happens! We’ll transform our dough into beautiful, apple-cinnamon rolls.
- Roll it out: On a lightly floured surface, roll the dough into a large rectangle, about 12×18 inches. Make sure to get the corners as square as possible for evenly sized rolls.
- Brush with butter: Brush the entire surface of the dough with 3 tablespoons of melted butter, leaving a small 1-inch border along one of the long edges. This butter acts as a glue for the filling and keeps the rolls moist.
- Sprinkle the filling: In a small bowl, mix the brown sugar and cinnamon together. Sprinkle this mixture evenly over the buttered dough.
- Roll it up: Starting from the long edge opposite the un-buttered border, roll the dough into a tight log. Keep the roll as snug as you can to prevent gaps in the finished product.
- Slice the rolls: Use a piece of dental floss or a very sharp knife to slice the log into 12 even rolls. My trick is to cut the log in half, then cut each half in half, and then cut each of those four pieces into three rolls. This method helps me get perfectly uniform rolls every time.
- Second rise: Arrange the rolls cut-side up in the prepared caramel pan. Cover loosely with plastic wrap and let them rise for another 30-45 minutes, or until they look puffy and have nearly doubled in size.
The Final Bake and Finishing Touches
- Preheat the oven: While the rolls are on their second rise, preheat your oven to 350°F.
- Bake: Bake for 30-35 minutes, or until the rolls are golden brown on top and the caramel is bubbling. If you notice the tops browning too quickly, you can tent them with a piece of foil for the last 10 minutes.
- Cooling and serving: The moment they come out of the oven, let the rolls cool for just 5 minutes. Then, using oven mitts, carefully invert the pan onto a large serving platter. The caramel and apples will tumble out, creating a rich, glossy glaze. If any apples or walnuts stick to the bottom of the pan, just scrape them out and spoon them back over the rolls.
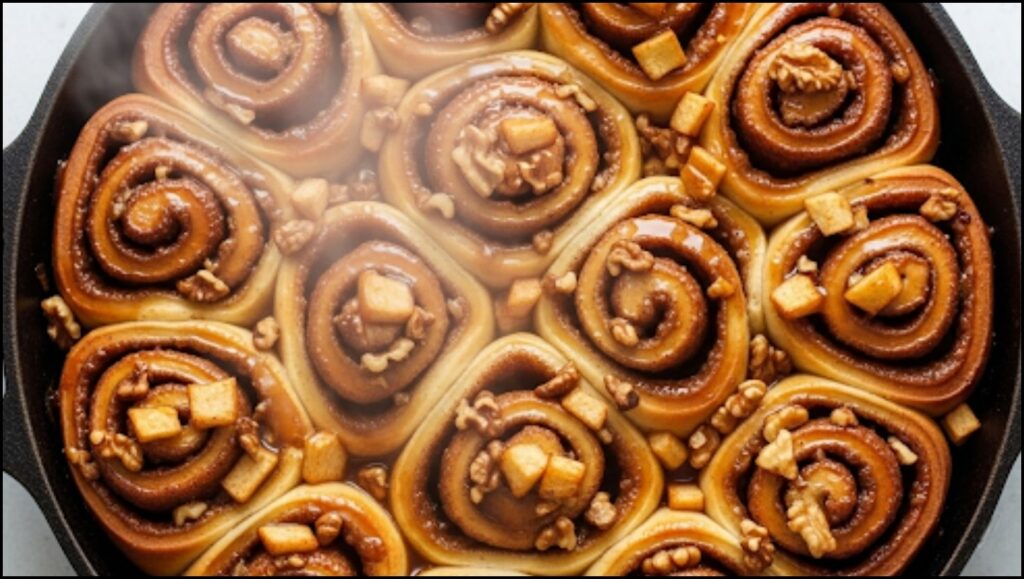
Serve these Caramel Rolls with Apples and Walnuts warm, with an extra sprinkle of toasted walnuts if you like. The combination of the warm roll, the gooey caramel, and the soft apple pieces is truly unforgettable.
A Recipe to Cherish
This recipe for Caramel Rolls with Apples and Walnuts is more than just a dish; it’s a way to create memories. The aroma, the warmth, and the simple act of sharing something delicious with loved ones are what make cooking so special. Don’t be intimidated by the yeast or the rolling—you’ve got this! Just follow the steps, and soon you’ll be enjoying a truly phenomenal breakfast treat that will have everyone asking for the recipe. Happy baking!
 The Ultimate Filipino Fried Chicken Recipe for Crispy, Juicy Perfection
 Unlock Flavor: How to Make the Perfect Avocado Veggie Panini Every Time
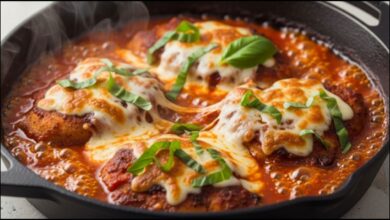 The Easiest Weeknight Chicken Pizzaiola Dish You’ll Ever Make
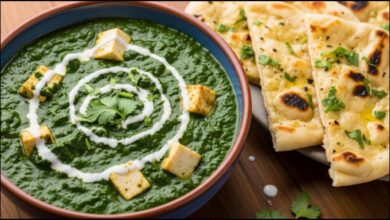 The Secret to a Perfectly Healthy Homemade Palak Paneer