How to Make the Best Butternut Squash Pecan Pancakes from Scratch
Whip up a batch of the coziest Butternut Squash Pecan Pancakes! This easy recipe delivers incredibly fluffy, flavorful pancakes packed with warm spices and toasted pecans. The perfect fall breakfast treat for the whole family.
There’s a special kind of magic on a crisp autumn morning, isn’t there? The air feels clean, the sunlight is golden, and the whole world seems to slow down just a bit. These are the mornings that call for something more than just a quick bowl of cereal. They call for a breakfast that feels like a warm hug. That’s where these incredible Butternut Squash Pecan Pancakes come in.
I developed this recipe after years of wanting to capture all the best flavors of fall in one simple, comforting dish. These aren’t just regular pancakes with a bit of squash mixed in. They are light, incredibly fluffy, and bursting with the earthy sweetness of butternut squash, the warmth of cinnamon and nutmeg, and the delightful crunch of toasted pecans. Forget your standard weekend breakfast; this is the one your family will ask for again and again. So, tie on your apron, and let’s make something truly special together.
Quick Recipe
- Preparation Time: 25M (includes 10-15 minutes for batter to rest)
- Cooking Time: 20M
- Total Time: 45M
- Type of dish: Breakfast, Brunch
- Cuisine: American
- Recipe Yield: 12-14 pancakes (makes 4-6 servings)
- Calories: Approx. 220 kcal per pancake (This is an estimate and does not include toppings like butter or syrup).
Why These Butternut Squash Pecan Pancakes Just Work
Over the years, I’ve tested countless pancake recipes, and I’ve learned that the secret to a truly great pancake lies in the details. This isn’t just about mixing ingredients; it’s about understanding why each step matters. We’re building flavor and texture from the ground up to create the perfect fluffy pancakes recipe.
The natural sweetness of the butternut squash means we don’t need a ton of extra sugar in the batter. The buttermilk provides a slight tang that cuts through the richness and, more importantly, its acidity reacts with the baking soda to create an incredible lift. And letting the batter rest? That’s my non-negotiable secret weapon for the most tender pancakes you’ll ever eat. Trust the process, and you’ll be rewarded with a breakfast that’s both impressive and deeply satisfying.
The Ingredients You’ll Need
Gathering your ingredients first, or what chefs call mise en place, makes the whole cooking process smoother and more enjoyable. Here’s what you’ll need.
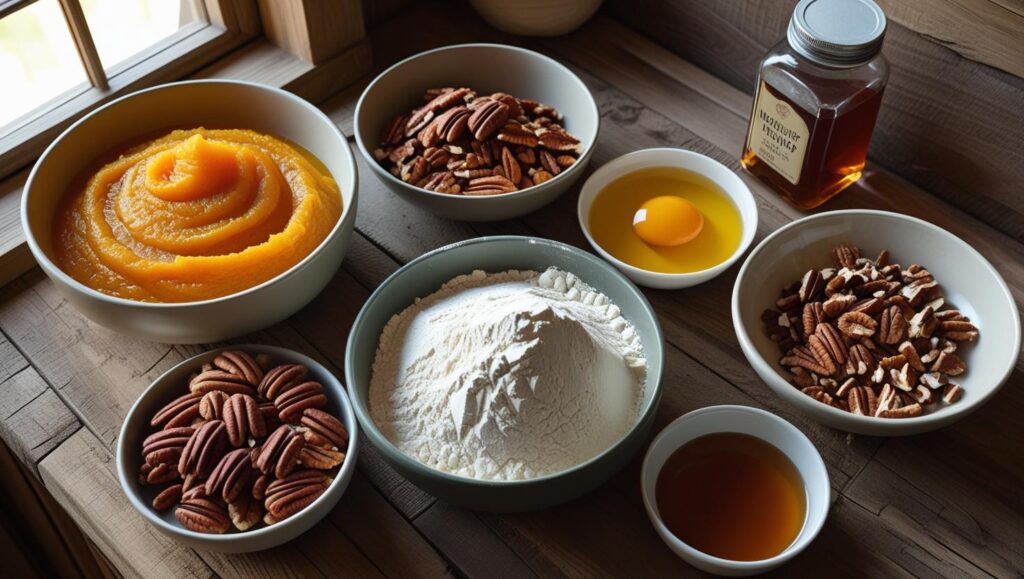
For the Pancakes:
- All-Purpose Flour: The foundation of our pancakes.
- Granulated Sugar & Brown Sugar: A mix gives you both simple sweetness and a hint of molasses flavor that pairs beautifully with the squash.
- Baking Powder & Baking Soda: Our leavening agents. Using both gives the pancakes an initial lift from the baking soda and sustained fluffiness from the baking powder.
- Salt: Just a pinch to balance all the flavors.
- Spices: Ground cinnamon and freshly grated nutmeg are essential for that classic fall taste.
- Buttermilk: The key to a tender, fluffy texture. If you don’t have any, see the FAQ for an easy substitute!
- Butternut Squash Puree: The star of the show! You can use canned, but I highly recommend making your own. It’s simple, and the flavor is unbeatable.
- Eggs: To bind everything together.
- Melted Butter: For richness and flavor. Use unsalted so you can control the salt level.
- Vanilla Extract: Enhances all the other warm flavors in the batter.
- Toasted Pecans: Finely chopped. Toasting them first brings out their nutty flavor and makes them extra crunchy.
A Quick Note on Homemade Butternut Squash Puree
Making your own homemade butternut squash puree is a game-changer. It’s fresher, more flavorful, and you control the consistency.
How to do it: Simply slice a small butternut squash in half, scoop out the seeds, and roast it at 400°F (200°C) for 40-50 minutes, or until it’s fork-tender. Let it cool slightly, then scoop the flesh into a blender or food processor and blend until smooth. That’s it! You can store it in the fridge for up to a week.
Essential Tools for the Job
You don’t need any fancy equipment for this recipe. Here are the basics:
- Two large mixing bowls
- A whisk and a rubber spatula
- Measuring cups and spoons
- A large non-stick skillet or griddle
- A thin, flexible spatula for flipping
Let’s Get Cooking: Your Step-by-Step Guide
Ready? We’ll break this down into simple, manageable steps. Follow along, and you’ll be flipping pancakes like a pro in no time.


Step 1: Combine the Dry Ingredients
In a large bowl, whisk together the flour, granulated sugar, brown sugar, baking powder, baking soda, salt, cinnamon, and nutmeg. Whisking is important because it evenly distributes the leavening agents, ensuring every single pancake puffs up beautifully.
Step 2: Mix the Wet Ingredients
In a second medium bowl, whisk the buttermilk, butternut squash puree, and eggs until they are just combined. Then, whisk in the melted butter and vanilla extract.
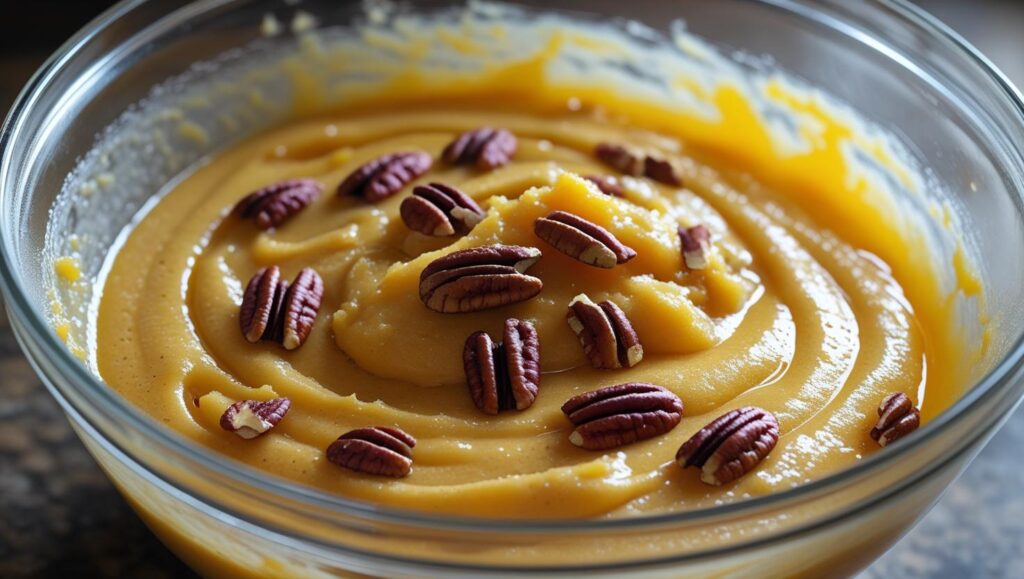
Step 3: Combine Wet and Dry (The Secret to Fluffiness!)
- Pour the wet ingredients into the bowl with the dry ingredients. Now, this is key: using a rubber spatula, gently fold the ingredients together until they are just combined. The batter should be thick and still have some lumps.
- This is the most important tip I can give you: Do NOT overmix the batter! Overmixing develops gluten, which results in tough, rubbery pancakes. A few lumps are your friends—they are a sign of a tender pancake to come.
Step 4: Fold in Pecans and Rest the Batter
Gently fold in your chopped toasted pecans. Now, cover the bowl and let the batter rest on the counter for at least 10 minutes (15 is even better). This allows the flour to hydrate and the gluten to relax, which is crucial for that coveted fluffy pancakes recipe texture. Don’t skip this step!
Step 5: Cook Your Pancakes
- Heat a large griddle or non-stick skillet over medium heat. You’ll know it’s ready when a drop of water sizzles and evaporates quickly. Lightly grease the pan with a little butter or oil.
- Pour about 1/4 cup of batter per pancake onto the hot griddle, leaving a couple of inches between each one. Cook for 2-3 minutes, or until you see bubbles forming on the surface and the edges look set.
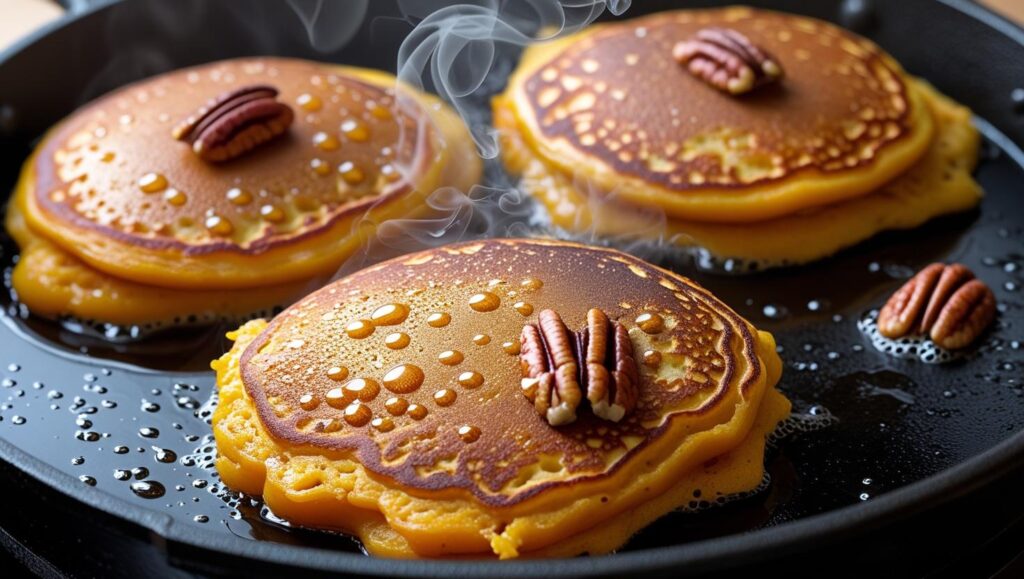
With a thin spatula, confidently flip the pancakes and cook for another 1-2 minutes on the other side, until golden brown. Don’t press down on them with the spatula—this will just compress them and ruin the fluffiness you worked so hard to create!
How to Serve and Store Them
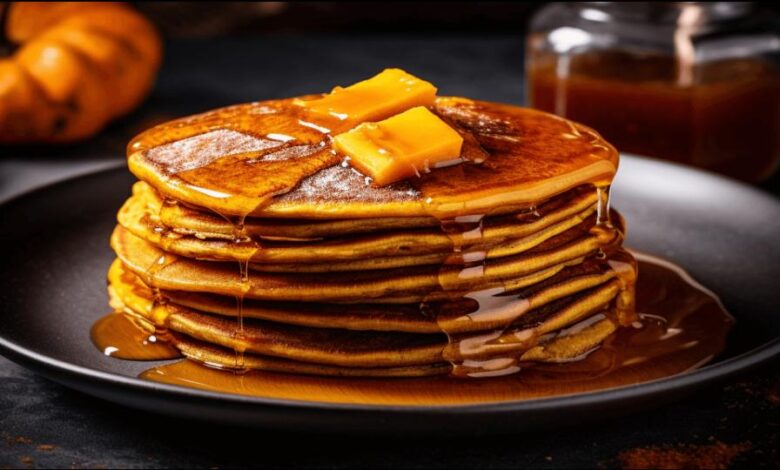
Serve these beauties immediately, stacked high and topped with a pat of butter, a generous drizzle of real maple syrup, and an extra sprinkle of toasted pecans.
If you have leftovers, they store wonderfully. Let them cool completely, then place them in an airtight container or zip-top bag in the refrigerator for up to 3 days. You can also freeze them! Just stack them with a small piece of parchment paper between each one and freeze in a freezer-safe bag. To reheat, simply pop them in the toaster or a microwave.
A Perfect Addition to Your Fall Breakfast Ideas
This recipe for Butternut Squash Pecan Pancakes is more than just a meal; it’s an experience. It’s the perfect way to celebrate the season and create warm memories around the breakfast table. Once you try them, I know they’ll become a treasured part of your collection of fall breakfast ideas.
Happy cooking and enjoy every single bite!
How to Make Perfect Peanut Butter Cheesecake Brownies from Scratch


